Though there is no storage tank for producing hot water in a tankless water heater, it still poses a risk for mineral build-up. The deposits of the hard water minerals block the water flow and eventually worsen the performance of the water heater. Thus, as an owner, it is essential to learn how to flush Rheem tankless water heater to get back the maximum amount of efficiency and longevity out of the investment.
But flushing a tankless water heater may seem daunting for you. However, fear not, as with the right guidance, you can also ensure a successful effort of yours like me.
Here, I’ll walk you through the step-by-step process in a clear and concise manner based on my personal experience so that you can tackle it confidently.
Let’s dive in and learn how to flush your tankless water heater for years of trouble-free operation.
Table of Contents

Safety Considerations When Flushing Your Rheem Tankless Water Heater
Flushing a tankless water heater is an essential task to ensure that the unit is running without any malfunction. But before or while flushing the unit, here are some of the safety considerations that you must need to keep in mind:
Tip #1: As for the first step, you must turn off the power supply to your water heater. If your tankless water heater involves an electrical breaker, we recommend to flip the breaker switch to the Off position.
Tip #2: As with turning off the electric supply, you will need to turn off the gas and water supply as well.
Tip #3: The greatest risk when flushing a water heater is accidentally burning with hot water. For instance, we highly recommend giving ample time to cool down the unit properly before attempting flushing procedures.
Tip #4: While flushing, be cautious while disconnecting the hot water outlet, as it may still contain hot water that may lead to severe burns.
Tip #5: Whether you are using vinegar or descaling solute, it is a must to follow the manufacturer’s recommendation outlined in the application guidelines.
Tip #6: Be cautious while disposing of the wastewater. This water contains sediment and minerals that are quite harmful to the environment as well. Thus, dispose this water properly following the local regulations.
Tip #7: If you have a gas-powered tankless water heater, don’t forget to check for gas leaks in all the gas connections. For better investigation, use a gas leak detector solution or apply soapy water methods to check for bubbles at the connections.
Tip #8: Last but not least, use proper tools to protect yourself from hot water, debris, and chemicals during the flushing process. To perform tasks safely and effectively, gather the following safety tools and equipment:
- Face mask: It will protect your entire face from hazards such as flying objects.
- Rubber gloves: You can protect your hands from hot water and the vinegar scent through it.
- Safety glasses: It will protect your eyes from splashing foreign objects, debris, dangerous particles or chemicals.
- Appropriate clothing: Try to wear appropriate clothing to prevent burns or scalding.
What Do I Need To Flush My Rheem Tankless Water Heater?
Here is the short item checklist that you will need to descale and flush your tankless water heater. Don’t panic! All the tools will be exclusively available at your local hardware store.
1. Channel Locks: You will need a channel lock to tighten the hose with the valve connection or to open any stubborn screw in any parts of your water heater.

2. One Gallon Of Food-grade White Vinegar: This weak acid will work here as a cleaning solution. It will effectively dissolve the calcium, magnesium, or any hard water buildup in the heater elements.

3. Submersible sump pump: You’ll need a submersible model to flush your tankless water heater. While plugged in, it pushes the vinegar through the tankless water heater.
For instance, make sure you are getting a low horsepower (hp) pump like a ⅕ or ⅙ hp. Otherwise, there will be a risk of pushing the vinegar through the tankless system too fast to clean the sediment.

4. Two hoses: These are the must to flush your tankless water heater. While in setup, you will need to connect the hose to the isolation valve. It’s recommended to use a standard garden hose that is made of durable materials like PVC or rubber.
Before purchasing, make sure the hoses can easily handle the flow of water without kinking or leaking.

5. Bucket: A large plastic bucket to hold the vinegar.
What Are The Steps To Follow When Flushing A Rheem Tankless Water Heater?
Here are the simple instructions that I’ve followed to descale and flush my Rheem tankless water heater. Thus, whenever you are heading to flush your Rheem tankless model, just make sure you’re following our provided order:
Phase #1: Preparation
Step #1: Turn Off Your Tankless Water Heater
Before you begin the flushing in your Rheem tankless water heater, it is a must to turn off the power supply to your water heater. Press the Power Button on the remote control and unplug it from the power connection.

If needed, flip the circuit breaker to the Off position where your water heater is connected. In case you are unsure which breaker is the right one for your water heater, it is better to track it down by using a non-contact electrical tester, or you may cut the power to the entire house.
Step #2: Turn Off The Isolation Valves & Gas
In the next step, you will need to stop water flowing to your water heater. For instance, locate the isolation valves for your water heater. Just close the inlet valve that is supplying the water heater with the cold water and the outlet valve that is supplying your tankless unit with the hot water.

On the hot water line, you will find a pressure relief valve. If needed, you can lift up the lever to release extra pressure from your water heater. But be cautious about the hot water as it may result in scald and burn.
Now it’s time to turn off the gas supply to your water heater. Locate the gas shut-off valve and turn the valve lever counterclockwise to stop the gas flow.
Step #3: Remove The Purge Port Valve Caps Located On The Isolation Valves
For this step, you will have to take off the drain caps located on both hot and cold water shut-off valves.

While doing so, take a container and hold it underneath the cold water drain.
Now, you will find the small blue inlet valve handle, reassembling as the letter “T.” Turn it on, and some water will come out remaining in the pipes. Reposition the container under the hot water drain and drain the water as well.
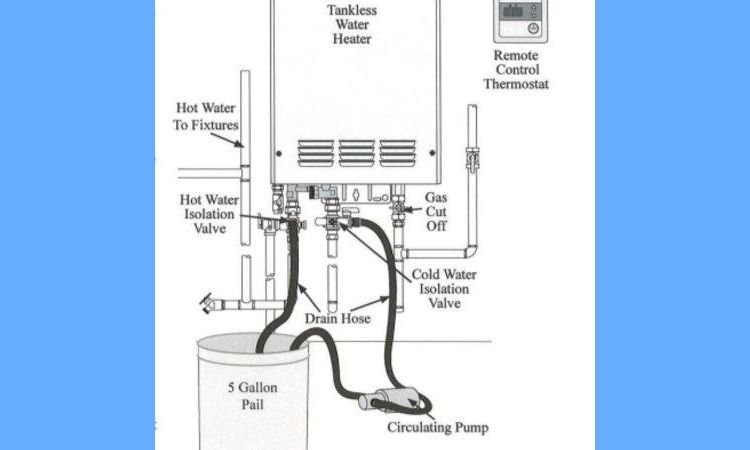
Step #4: Attach the Hose To The Isolation Valves & The Circulation Pump
Now, take two garden hoses to connect with the isolation valves.

First, take one hose and connect it to the cold water drain valve. Attach the other end of the inlet hose with the circulation pump and place the discharge line in a bucket.
Now, it is time to connect the hose to the hot water drain valve. Attach the hose with the hot water drain valve and place it in the same bucket. Use pliers to ensure a snug connection.
If you are confused, see the picture below for better understanding.
Step #5: Fill A 5-gallon Bucket With Distilled White Vinegar
Now it’s time to prepare a vinegar solution. Take a large bucket and fill it with the 5-gallon distilled white vinegar.

But make sure the bucket is clean first. Now gently place the pump pnm the bucket. Make sure the sump pump is fully submerged to the vinegar solution.
Phase #2: Flushing
Step 01: Open both isolation valves and turn on the pump
When all the above setup is done, open the valve lever on the isolation valve of the cold & hot water inlet by twisting them perpendicular to the position. Plug in your sump pump and turn it on. Let it run for about one hour.
By doing so, the vinegar will start pulling into your cold water drain by the pump and then travel into your tankless water heater. After that, it will travel through the unit and finally get out of the hot water drain and back into the bucket.
Step 02: Turn Off The Pump
After completing the full hour, just turn off the circulation pump.
Phase #3: Finishing Up Your Tankless Flushing
Step 01: Remove The Hoses
Now unscrew the hoses and remove them from the bucket. Then, place the port caps back in the valve connection. Tighten the caps completely and firmly.
Now, if you suspect any remaining cleaning agent in the tankless unit, you will just need to remove it. To do so, keep the hose connected to the hot water outlet and close the cold water isolation valve.

Take the second hose out of the bucket and point it down a drain or outside. Now open the cold water supply valve and let the water run for 5-10 minutes more. When done, close the supply valve.
Close the hot water isolated valve as well. This will successfully push water up the system and flush out everything through the hose connected to the hot water side.

Step 02: Clean The Inlet Filter Screen
As with flushing tankless water heaters, it is essential to clean the water filter for proper cleaning of your tankless water heater. A water filter is an essential element of the tankless water that is specially designed to prevent hard minerals from entering the water heater and protect the system from damage.

As for always contacting the hard water, minerals stuck in the filter screen are quite obvious. That’s the purpose you need to be regular to clean this filter. That’s so easy to perform.
Simply unscrew the filter from the connection. Take it out and rinse it under running water to remove dirt and clean the sediments.
If needed, use a Q-tip and remove large particles stuck in the filter screen. After cleaning, let the filter dry and reassemble it back in the connection.
Step 03: Open The Supply valves
When all is done, it’s time to open both the hot water supply outlet and the cold water supply inlet. After that, don’t forget to check for leakage in your Rheem tankless system.
Step 04: Turn Your Tankless Water Heater Back On
If everything is in tip-top condition, just plug the heater back in the power connection. Turn on the water and gas shut-off valve. Press the power button and enjoy ultimate hot water without any restrictions.
We’ll recommend turning the hot water for some time as it will effectively allow mair to be pushed out of the lines to your fixtures.
With that done, congratulations!!! Your Rheem tankless water heater is flushed correctly. If you are concerned about Rheem tankless water heater maintenance, I bet checking out our comprehensive guide on this topic will certainly be worth it for you.
How Often Should I Flush My Rheem Tankless Water Heater?
Depending on the water condition running to your water heater, you will have to make a schedule to descale and flush your tankless water heater. But in general, the manufacturer recommends to flush the unit at least once a year.
If you are living in a hard water area, consider flushing and cleaning your rheem tankless water heater even more frequently, perhaps every six to nine months.
This is because an excessive amount of magnesium and calcium build up in the heater inside through hard water supplies. It will not only help to prevent frequent malfunction of the unit but also extend the lifespan of the heater.
Do I Need To Flush My Tankless Water Heater If I Have a Water Softener?
Yes, even if you have a water softener for your tankless water heater, you will still experience hard water buildup in the unit.
By installing a water softener, you can primarily reduce the hard minerals like calcium and magnesium from the water, preventing the formation of scales inside your water heater. But it is not eliminating it entirely.
Thus, flushing a tankless water heater remains crucial to keep your tankless water heater running efficiently, especially in areas with very hard water.
When To Call A Pro?
Descaling and flushing a tankless water heater is a relatively simple DIY project to perform. If you have basic plumbing skills and are comfortable with using tools, you can handle it by yourself. Just purchase a cleaning kit, hoses, and circulation and get started.
But if everything seems like a major hassle for you, hiring professional plumbers to complete the task for you will be a smart way to go. They have the knowledge and experience to do the job correctly.
While doing so, they can identify and address any issues arising in the system. Even it will be a bonus point for you if your water heater is still under warranty.
The Benefits Of Flushing A Tankless Water Heater
Flushing a tankless water heater simply means that you are cleaning the system with a descaling agent which removes sediment or buildup. But don’t assume the benefits end here.
Let’s have a short glimpse of the ultimate advantages of periodically flushing a tankless water heater:
i) Improved Efficiency
First and foremost, you can improve the efficiency of your water heater by flushing the system. By properly cleaning the heater, the system will likely have to work less, leading to the use of less energy and quickly heating the water. As a result, it lowers your energy bill as well.
ii) Help Prevent Malfunctions
If your tankless water heater is well maintained, there will be fewer chances of malfunctions or breakdowns. It also catches minor issues which you can fix by yourself without costly repairs.
iii) Improve Heating Speed
Flushing the water heater speeds up the heating cycle and improves the overall performance of the system. It helps to restore efficient heat transfer and decrease the time and energy to heat the water.
iv) Extended Lifespan
Through flushing the water heater, you can extend the lifespan of the system. Sediment buildup causes corrosion and overheating that damages the heater. An effective cleaning will save you from this and help the heater to provide efficient heating continuously.
v) Prevention of Foul Odor
Hard water mineral build-up leads to the development of bacteria in the water that produces foul-smelling odors. Through quick flush, you can easily eliminate these odors and improve the quality of your hot water.
What Happens If You Don’t Descale And Flush Your Tankless Water Heater?
If you’re not flushing your tankless water heater regularly, minerals and sediment will build upon the heater element. Eventually, the pipelines may also be plugged up or corroded. Overall, it will be enough to reduce the efficiency of the system, and in worst cases, you may need to replace the entire system as well.
Here are some potential drawbacks you may experience if you’re not flushing your water heater regularly:
#- Lukewarm or no hot water from faucets: If you are getting lukewarm water from your hot fixtures, it is likely that a layer of sediment buildup in the water is the root cult. At times, you may experience no hot water from your Rheem tankless water heater.
#- Water heater keeps turning off: If your Rheem tankless water heater is failing to stay on, it is one of the big signs that the heat exchanger is plugged with the hard minerals. Deposits inside the heat exchanger raise the inside temperature to an extreme level, which turns off the system unexpectedly.
#- Leakage in the water heater: In case your Rheem tankless water heater experiences leakage at the bottom, it tells you that sediment or rust buildup in the heater inside due to bad water conditions. Even When the sediment goes at a larger amount, it may result in pinholes in the unit, leading to eventual leakage.
#- Water damage: Accumulation of the sediment in the water heater could erode the entire system as well. If it is ignored, chances are your tankless water heater could burst and flood your home. This simply costs you thousands to repair the unit due to water damage.
#- Spike in energy bills: The layer of sediment build-up in the heater acts as an insulator, making it harder for the heater system to transfer heat to the water. It eventually increases energy consumption, leading to an increase in your energy bills.
#- Hotspot Formation: The accumulation of the hard mineral creates a hotspot on the heater element, which leads to overheating the unit. At times, the heating element may stop working at all.
Can I Flush an Unmaintained Rheem Tankless Water Heater?
Yes, you can still flush your tankless water heater, but it may pose several risks to the system. Such as creating a pinhole due to a weakened component, leakage in the heater unit or potential scalding from hot water discharge.
When you are talking about the best outcomes by regular maintenance and flushing the water heater, it is cleaning the parts of the system. Doing so, you can easily restore the efficiency of the heater and protect it from scald damage.
But wait! as with flushing a tankless water heater is bringing endless advantages for you, we’ve discovered many more problems due to flushing an unmaintained water heater.
Let me highlight some potential risks and considerations to keep in mind when flushing an old, unmaintained tankless water heater:
- Pinhole leaks: If the scale buildup stays in the pipeline for a long time, it may lead to rust or corrosion buildup in the pipelines. Corrosion weakens the integrity of your pipes. Now, when you allow flushing away scale at that point, it will simply create a punch hole through the weak point.
- Leakage: If your tankless unit is unmaintained and in poor condition, flushing can potentially dislodge or damage components inside the heater, leading to leaks or any other major issues.
- No Immediate Improvement: If your tankless water heater is severely damaged or has almost reached the end of its lifespan, descaling and flushing it may not provide significant benefits. In such cases, Rheem Tankless water heater replacement may be the best option.
Thus, before attempting to flush an old and unmaintained tankless water heater, we recommend consulting the manufacturer to verify the overall condition of the unit. They will professionally access the heater condition and better suggest to you whether flushing the unit could help you retain the efficiency of the system.
Frequently Asked Questions (FAQs):
How much does it cost to flush my tankless water heater?
In general, the DIY cost of flushing a tankless water heater will range between $50 to $150 for materials like a flushing kit, a descaling solution, and a pump. But if you’re hiring a professional plumber or technician, you may expect to pay up to $100 to $300 or more, including the labor cost and materials cost.
Is there any disadvantage in flushing my tankless water heater?
To be honest, there are no downsides to flushing your tankless water heater. A flush will help you to break down sediments that could cause the blockage in the system, leading to several issues in the system.
Should I use a commercial descaler to flush my tankless water heater?
Many heater users use commercial descalers to dissolve the mineral buildup more effectively. It is like a fast-acting solution that descales the heater quickly and efficiently. But as it contains stronger acids, which may potentially harm the system if not used properly.
Are flushing procedures for the gas tankless and electric tankless water heaters the same?
Yes, Flushing a gas tankless water heater and an electric tankless water heater has a similar process, except for minor differences to consider. In gas unit, you just need to turn off the gas supply, while electric units will only require you to turn off the power supply.
In Closing!
Beyond any doubt, a tankless water heater is an efficient way to provide hot water for your home. But unlike other traditional appliances at your home, your Rheem tankless water heater also requires regular maintenance to ensure it operates at its peak efficiency.
One essential maintenance task that needs to be tackled periodically is to flush the unit to remove mineral deposits and sediment accumulated in the system over time. In this guide, I’ve successfully shared the detailed processes of how to flush Rheem tankless water heater, including the tips and tricks that I’ve been following for many years.
By following our guidelines, hope you can effectively clean out your unit and enjoy the benefits of consistent hot water and lower energy bills.
While in operation if you face any troubles, give a thorough read of our Rheem tankless water heater troubleshooting guide and expand your plumbing knowledge as well as find your solutions.