The 6 3 flashes in your Rheem gas water heater mean that the heater is in system lockout mode. The reason behind this error code is that the flame is lost. So, how to fix 6 3 flashes on the Rheem water heater?
You’ll have to find the root cause of the issue and fix the problem. Here are the most common culprits behind this issue according to my own experience working on heaters:
- Gas supply problems.
- Restricted or blocked combustion air supply.
- Clogged or damaged pilot tube.
- Damaged pilot igniter wire.
- Carbon deposits on the pilot electrode.
Table of Contents

I’ll talk about how you can fix each of these issues in detail in this guide. So, let’s dive in!
How To Fix 6 3 Flashes On Rheem Water Heater
I’ll discuss the main reasons why you get the 6 3 flashes error code in your Rheem gas water heater. You’ll also learn the fixes for each of these reasons.
01. Temporary Glitch
Believe it or not, the 6 3 flashes error comes up in Rheem gas heaters due to temporary glitches. It’s possible that this code would come up even if there’s nothing wrong with your heater.
How To Fix:
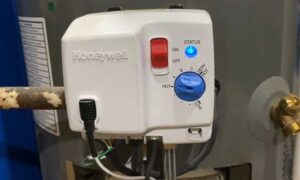
There’s no reason to sweat about this code if that’s the case. You can just restart the gas valve and that’ll fix the error code. Turn off the gas control valve for a minute and turn it back on.

The error code should go away after you do that. If the code still remains or comes back after a while, it means there’s a real problem with your water heater. You need to keep on reading so that you can find and fix the issue if that’s the case.
02. Gas Supply Problems
Gas is the main and only source of fuel in gas water heaters. If there are any issues with the gas supply, it’s normal that the heater won’t work properly. Either the pilot won’t light or the main burner won’t ignite when there are problems related to the gas supply.
But what exactly are these problems? The first major issue is running out of gas. If you own a unit that runs on natural gas, make sure you still have the proper supply. Turn on another gas-powered device in your home. If it ignites, that means there’s a proper gas supply in your house.
If you’re using an LP gas water heater, there’s also the possibility of running out of gas. Check the tank and see if that’s the case.
Secondly, the gas shut-off valve may not be fully open. There’ll most likely be a manual gas shut-off valve that controls the gas supply to your water heater. If it’s not fully turned on, there could be issues with the gas supply.

Finally, another common problem related to gas supply is having low gas pressure. The gas pressure needs to be within the specified range of the heater for it to function properly. Otherwise, there could be issues with it like showing this 6 3 error code.
How To Fix:
If your heater runs on natural gas and there’s no gas supply to your home, it’s most likely due to not paying your bills. Just clear your dues to restore the gas supply to your home. Sometimes, this issue can also be caused due to a problem with your gas supplier. You’d just have to wait it out in that case.
For heaters that run on propane, you can refill or replace the gas tank. It’s always handy to keep a spare gas tank if you use LP. You can immediately replace the empty one and never run out of gas supply if you do that.
Secondly, make sure the gas shut-off valve is fully open. It’ll be completely parallel to the gas lines when it’s fully open. If it was only partially open, turn it to the completely open position. Hopefully, that’ll solve the issue.
Finally, you have to check the gas pressure and make sure it’s within the specified range. A manometer is used to measure the gas supply. If you don’t have it, contact your local gas supplier.
You’ll get the minimum and maximum gas pressure for your water heater by looking at its rating plate. When you get the gas pressure, compare it with the readings in the rating plate.
If it’s outside the recommended range, ask your local gas supplier to fix the gas pressure. Use the rating plate as a guideline for the right gas pressure for your Rheem water heater.
03. Blocked Combustion Air Supply
Gas isn’t the only thing your Rheem water heater needs to heat the hot water. It also needs an adequate supply of air. That’s why you’ll notice many air inlet openings at the bottom of your water heater.

But if the air inlet openings are blocked, then the required amount of air won’t flow to the combustion chamber. So, the pilot or the main burner can turn off at any time due to it. When that happens, the gas control valve gets the signal and displays the 6 3 error code.
Besides that, a combustion chamber that’s too dirty could also cause this issue. The combustion chamber goes through a constant burning process. As a result, soot and dirt continue to pile up on it. If you don’t clean it at periodic intervals, it can also cause issues with the combustion chamber.
How To Fix:
Luckily, this problem has a simple fix. If there’s anything blocking the combustion air inlet openings, you need to remove it. The general rule is there should be at least 2 inches of clearance between the air inlet openings and the other objects. You must maintain that.
Make sure the drain pan of the water heater doesn’t block the air supply to the combustion chamber. Some people also insulate the heater including the air inlet openings. Don’t make that mistake. The air inlet openings should always be free from any blockage and let air flow freely.
You should also clean the combustion chamber if it’s dirty. Pull out the main burner and clean it with a vacuum cleaner. There’s also a combustion shut-off device in Rheem gas hearts. It could get tripped due to unfavorable combustion conditions. Keep the combustion chamber clean so that it doesn’t happen.

04. Damaged Pilot Tube
The pilot tube needs to be in tip-top condition to let gas pass to the pilot. If it’s pinched or clogged in any way, the pilot won’t get enough gas. So, it’ll continue to go out and cause the 6 3 flashes error code.

How To Fix:
When you have a damaged pilot tube, you have to replace it. But you may not find it as a separate unit. So, you may have to replace the entire pilot assembly. I have a dedicated section on how you can replace the pilot assembly later on in this guide. Keep reading and check it out if you need it.
05. Carbon Deposits On Pilot Electrode
When there are carbon deposits on the pilot electrode, it won’t be able to produce a spark. And without sparks, the pilot won’t light up. So, your heater can go into lockout mode and display the 6 3 flashes error code.
How To Fix:
You can clean the pilot electrode if it’s dirty. You’d have to pull out the main burner and isolate it. Scrub the electrode with an emery cloth or fine-grit sandpaper to remove the carbon deposits. Hopefully, that’ll solve the issue.
But sometimes the electrode can be totally damaged. It’ll be beyond repair at that point. Your only option would be to replace it. But you may not find it as a separate unit and you’d have to replace the pilot assembly. You can learn how to do that later on in this article.
06. Faulty Pilot Igniter Wire
You already know that a damaged electrode won’t produce a spark. The same goes for a bad igniter wire. It can keep the pilot from lighting up. Eventually, it can lead to the 6 3 flashes error code or the 6 1 flashes error code.
How To Fix:
You have to replace the faulty component. There are very few chances that you’d find the pilot igniter wire separately. So, you can just replace the entire assembly instead. Besides, it’s better to replace the pilot assembly altogether if you’re looking for a long-term solution.
How To Replace The Pilot Light Assembly?
More often than not, the 6 3 flashes error code would lead to you changing the pilot light. You’d get a replacement part for free if your unit is still under warranty. All you have to do is call Rheem tech support and they’ll send it.
They’ll also troubleshoot the problem with you over the phone. If you want a technician to do the installation, you can ask them to send one. But it’s easy enough to do on your own. The additional tools you’ll need on top of the replacement pilot assembly are:
- T20 Torx socket or driver.
- Philips screwdriver.
- Wire brush.
- Needle nose pliers
- Normal pliers.
- ¾ inch and 7/16 inch wrenches.
Once you’ve managed all these tools, you can follow these steps to do it:
Step 01 – Remove Gas Valve Connections
Turn off the gas supply to the water heater. It should be in a horizontal position. That means it should be perpendicular to the gas lines. Turn off the gas control thermostat as well to be extra safe. Unplug the power cord of the heater as well.

Make sure you wait for the heater to cool down if it has been active recently. Remove the outer burner door. It’s also called the jacket door. Then, it’s time to remove the gas valve connections to the main burner.
First of all, pull out all the connectors on the gas control valve. Then, take the 7/16-inch wrench and remove the pilot line connection. You need to use the right-sized wrench so that the metal doesn’t get stripped. Similarly, remove the main burner gas supply line using the ¾ inch wrench.
Step 02 – Remove The Main Burner
Once you remove all the gas valve connections, you’re ready to take off the main burner assembly. Use the T20 Torx screwdriver to remove the four screws holding the main burner door in place. After undoing the screws, you should be able to easily slide out the main burner.

The burner gets dirty all the time as it’s in charge of burning. So, whenever you pull it out, it’s a good opportunity to clean it. Though my goal is to replace the pilot light, you can clean the main burner as well. You can scrub it with a mild detergent until you get all the dirt out of it.
Step 03 – Remove The Old Pilot Assembly
Remove the gasket behind the main burner door if your kit comes with a replacement part. Take the Phillips screwdriver and remove the screw that is shown in the picture below:

Similarly, remove the other screw that holds the pilot to the burner bracket. Another gentle reminder for you is to make sure you use screwdrivers of the right size. Otherwise, the screws can get stripped.
The next step is to pull out the old pilot assembly. You have to remove the orange rubber gasket in the burner door to do that. Then, you can pull out the old pilot assembly by feeding it through the main burner door.
Step 04 – Replace The New Pilot Assembly
Now, it’s time to install the new pilot. Feed the pilot tube through the hole in the burner door. Before you put in the new pilot, bend in the same way as the old pilot. You don’t have to be precise here.
All you have to do is try to bend the new one in a similar shape to the old one as much as you can. Here’s an example of it:

Clean the area of the gasket behind the main burner door. Some of the glue from the old gasket will be still attached to it. You can clean it with a wire brush. If any of the adhesives still remain, you can use soap and water to take them off until that area is clean.
Then, you can put the new pilot assembly in its place. One end of the pilot will attach to the main burner and the other will connect to the gas control valve. You can install the new main burner gasket after that.
From there on, it’s a process of reverse engineering the entire process. You’ll put everything back together in the same way as you removed it. One additional thing you can do here is clean the combustion chamber as well. It’s a good idea to clean the heater components as often as you can.
Test for gas leaks after you’re done installing the new pilot assembly. That’s how easy it is to replace the pilot. Hopefully, replacing the pilot will get rid of the error code. Turn off the gas supply to your water heater and relight the pilot. Hopefully, it’ll work without any issues.
You may notice a burning smell a few days after installing the new pilot assembly. Don’t worry, it’s normal for new pilot assemblies. The smell will dissipate in no time.
Note: Are you facing any other issues with the pilot light in your heater? Check out my guide on Rheem pilot light problems to learn more about these issues and their fixes.
FAQs:
What does the 3 6 flashes error code mean on a Rheem gas heater?
The 3 6 flashes code is the same as the 6 3 flashes code. It just depends on how you interpret it. If you count the 3 flashes first, it’ll be a 3 6 flashes error code. If you count the 6 flashes first, it’ll be the 6 3 flashes error code.
What causes the Rhem 6 1 flashes error code?
The 6 1 flashes error code is awfully similar to the 6 3 flashes error code. It occurs due to the same reasons. Hence, the same fixes can be used to clear this error code.
What causes the Rhem 6 2 flashes error code?
This code means that the system is in lockout due to the flue damper switch being on. It could be due to improper installation, a faulty damper switch, or loose wiring connections. Find the faulty area and fix it.
What causes the Rheem 6 4 flashes error code?
It’s a code that indicates the flame is out of sequence. This code usually appears when the gas control valve is stuck open. You need to replace the gas control valve to clear this error code.
What does the Rheem 8 4 flashes error code mean?
It means that the system is in lockout mode due to a fault with the gas control valve. You can try resetting the valve and see if the code disappears. If that doesn’t work, you’ll have to replace the gas control valve.
Conclusion
How to fix 6 3 flashes on Rheem’s water heater? Now you know the most common causes behind it along with their appropriate fixes. Hopefully, it’ll be due to a temporary glitch and you’ll get away by resetting the gas valve.
But you’re also prepared to fight the more serious issues. Be calm and solve each of the problems one by one. Check out my Rheem 7 flashes guide to know how to fix that error code if it ever comes up.