The dip tube is essential in water heaters as it directs cold water to the bottom of the tank. It makes sure that the new batch of cold water is heated fast. But they can go bad at times, and you have to replace them in those situations. So, how to replace Rheem water heater dip tube?
I’ve done this job multiple times and I’ve broken the process into simple steps. The main steps in replacing the dip tube include:
- Draining the tank.
- Disconnecting the cold water supply line.
- Removing the old dip tube and installing the new dip tube.
You’ll find everything you need to know about replacing the dip tube in this guide. I’ll also discuss the most common signs of a bad dip tube. So, let’s dive right in!
Table of Contents

Why Should You Replace The Rheem Dip Tube?
You may think that the dip tube is not an important component as it’s relatively cheap. But that’s not the case. A dip tube greatly increases the efficiency of your water heater.
It’s connected directly to the cold water supply line. It directs the water to the bottom part of the tank so that the water can get heated easily. Then, the heater water moves to the top of the tank.
If you open a hot water faucet when the cold water is being heated, the water will come from the top of the tank. So, you’ll get water that’s close to your desired temperature.
But when the dip tube gets bad, the new cold water will be mixed with the already hot water. So, you’ll only get lukewarm water if you call for hot water in that situation. That’s why it’s a common issue that the hot water isn’t hot enough when someone has a bad dip tube.
If you frequently get water that’s not hot enough and you often have to set the thermostat to the highest temperature settings, you likely have a dip tube that’s melted or gone bad.

Another sign of a faulty dip tube is that the water will switch from hot to cold as you’re taking a shower. Keep in mind that using an undersized heater or a plumbing crossover can also cause this issue. So, rule out the other problems before you go ahead and replace the dip tube.
A sure-shot way of knowing that you have a broken dip tube is small flecks of plastic pieces will come out of the hot water faucets. If you see that, you can be certain that you have a bad dip tube and move on to replace it.
How To Replace Rheem Water Heater Dip Tube [Fully Explained]
Before I get into the replacement procedure, it’s important that you get the right replacement dip tube for your Rheem water heater. Follow this Rheem dip tube guide to get a list of all the available dip tubes.
Match the part numbers here with the right one for your water heater. You can look at your owner’s manual to cross-check the part numbers. You can also call Rheem and tell them the model number of your heater. They’ll guide you on the right dip tube for your water heater.
Once you’ve got the right part, you also need the following tools to replace the dip tube:
- Garden hose.
- Flat blade screwdriver.
- An adjustable wrench.
- Pipe wrench.
- The other parts vary based on the piping.
You can easily replace the dip tube on your own if you have all those tools. Follow these steps to complete the dip tube replacement process:
Step 01 – Drain The Water Heater
Turn off the power to the water heater at the circuit breaker if you have an electric water heater. For gas water heaters, you can adjust the gas control knob to the “Pilot” or “Off” position.

Then, you have to shut off the cold water supply. You can do it by turning the valve perpendicular to the water lines. If there is no cold water shut-off valve, you can shut off the main water supply to the residence.
Open a hot water faucet to relieve the pressure inside the tank. It should stop producing hot water soon and that way you’ll also confirm that the water supply is off. Next, you’d have to drain the tank.
Attach one end of a garden hose to the drain valve of the tank. You can set the other end of the hose to a floor drain that’s close by or to a bucket. Adjust the screw of the drain valve using the flathead screwdriver to drain the tank.

You don’t have to drain the tank all the way. Draining somewhere between 8-10 gallons should be enough to replace the dip tube. All you have to do is drain enough water to empty the water distribution piping above the tank.
Step 02 – Remove The Old Dip Tube
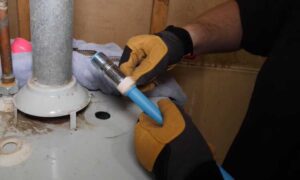
Disconnect the cold water supply line. You can use an adjustable wrench to remove the flex connector in this heater. Your heater’s components may be different such as rigid copper tubing. In that case, you’ll have to cut it.

You can reuse the flex connector you removed if you don’t have the tools for soldering. The only condition for that is that the gaskets are in great condition. Or you can just get a new flex connector.
Most jurisdictions have a minimum copper or braided riser length of 18 inches and 6 inches from type C venting to any combustible. The braided riser in this installation is 12 inches and that’s why the white PEX tubing is connected so close to the top of the tank. It’s also very close to the type C venting.
Here, I’ll replace the whole section with ¾ inch copper. Remove the plastic shroud on top of your water heater to access the dip tube. Use a pipe wrench or adjustable pliers to remove the dip tube. You’ll have to spin it in a counterclockwise direction until it comes loose. Then, you can pull it out.

If you’re having difficulty and the tank is shaking when you try to remove the dip tube, the connection is too tight. Have someone hold the tank so that it doesn’t move. Then, you’ll have an easier time getting the dip tube out.
Now, you have to get the new dip tube to the right length. Put the new and the old dip tubes side by side. Cut the new dip tube to the length of the old one.
Sometimes, the old dip tube will be severely deteriorated and you won’t be able to tell where it begins and where it ends. In that case, you can just cut the dip tube in a way that it’ll be 3-4 inches above the gas control valve.
So, how do you measure it easily? You can turn the dip tube upside down and put the threaded part of the dip tube 3-4 inches above the valve. Then, you can cut the other end at the top of the tank.
Step 03 – Install The New Dip Tube
Now, it’s time to put everything back together. Before putting the dip tube in its place, apply Teflon tape or a sealant to the lower threads of it. Then, drop the dip tube in the right position.
You can hand tighten it at first. The jaws in some pipe wrenches can be wide enough to damage the upper threads of the dip tube. So, use an adjustable wrench with thinner jaws to tighten the dip tube and secure its position.

Then, you can reattach the plastic shroud. Apply Teflon tape on the upper threaded part of the dip tube as well. You can reattach the plastic shroud to hold the position of the dip tube now.
Now, it’s time to reconnect the cold water supply line. This is where the installation may differ depending on what you want. You can simply reconnect the flex connector or get a new one and tighten it. You’ll be done at that point.
But as I’ll be replacing it with copper, I have some more work to do. I’ll use a dielectric union and ¾ inch copper. I’ll also use an ¾ inch ball valve and a female Pex adapter for the installation.
Clean the copper fittings you want to install. Take your time to clean, deburr, flux, and inspect the joints. Once you’re happy, you can secure the fittings with the tank and complete the installation.
Note: Never ever solder the fittings directly connected to the tank. The heat can travel down the copper, damage the fittings in the tank, and even melt the dip tube.
If you had to turn off the main water supply in your house, open it up slightly. It’ll allow the water lines to fill. If they’re filled, you can fully open the main water supply valve.
Do the same thing with the cold water shut-off valve at the water heater. Start by opening it up a little at first. Keep a hot water faucet open at this point. It’ll purge the air from the tank.
When the water comes out of the faucet without any air, you can fully open the cold water shut-off valve. You can close the faucet at this point at let the tank get filled.
Make sure none of the connections are leaking water. Once that checks out, you can set the thermostat to your desired settings. Then, you can sit back and enjoy the steady steam of hot water.
FAQs:
Can you run the water heater without replacing the dip tube?
Technically, you can but you’ll get lukewarm water in those cases. You may also have to set the temperature to the highest setting. Given how inexpensive a dip tube is, it’s not worth the hassle and you should replace it.
What is the cost to replace a dip tube?
It largely depends on the quality of the dip tube and the part number of your model. They can range anywhere from $7 – $100. But you won’t have to spend extra if you do complete the replacement yourself.
Where is the dip tube on a Rheem water heater?
The dip tube is installed inside the tank and it’s installed on the cold water supply. That’s why it can be difficult to spot if you don’t have experience working with heaters.
Are there dip tubes in all types of heaters?
All tank-style water heaters usually have a dip tube. It doesn’t matter if you have a gas or electric unit. If there’s a tank, it’ll most likely have a dip tube to send cold water to the bottom.
Conclusion
How to complete the Rheem dip tube replacement process? Now, you should no longer have any questions about it after completing this guide. You can follow the instructions in this guide to do it yourself.
If any of these things seem hard to you, there’s always the option of hiring a qualified technician. Do what feels right for you. You can check out my Rheem drain valve replacement guide in case you have to replace that too.