If the drain valve in your water heater is cracked, hot water will leak out of it. As these valves are not repairable, you’d want to replace them. So, how to replace Rheem water heater drain valve?
I’ve done it multiple times. I can tell you that it’s an easy process and you can do it on your own. Some of the major steps in doing this replacement job include:
- Turning off the power or gas supply to the heater.
- Draining the tank.
- Replacing the drain valve.
- Checking for leaks.
I’ve broken down the replacement procedure into such easy steps that anyone can replicate it. You can replace the drain valve yourself even if you’re not a pro. So, let’s dive right in!
Table of Contents

When Should You Replace Rheem Water Heater Drain Valve?
Let’s look at the most common reasons why you’d want to replace your Rheem water heater drain valve:
01. The Drain Valve Is Leaking
When you have a drain valve leaking, your first instinct may be to conclude that the drain valve is bad right away. But that’s not always the case.

The drain valve may not have been closed all the way. That’s how it could be leaking. But if you have a drain valve that leaks even after fully shutting it off, it’s bad. You have to replace it in such situations.
02. The Drain Valve Has Bad Water Flow
Another warning sign of the drain valve going bad is when it has bad water flow. If it takes forever for the drain valve to drain the water, it’s not serving its purpose properly.
Check how much water is flowing through the drain valve when you discard water from the tank. If it’s too low, it’s a good sign that the drain valve has lost its effectiveness. You should replace the drain valve so that you can drain water from your heater much faster.
03. The Drain Valve Is Made Of Plastic
Finally, there may be nothing wrong with your drain valve immediately. But it could be made of plastic. There are many Rheem models where a plastic drain valve is given by default.

It’s not a good-quality drain valve. They don’t last too long anyway. So, it’s a good idea to replace them right away. You should opt for drain valves that are made of bronze. Such drain valves normally last for a long time.
How To Replace Rheem Water Heater Drain Valve [Explained]
Replacing the drain valve is an easy job. You can do it yourself even if you don’t have any prior experience. I’ve broken the entire process into easy steps that you can easily follow.
I’ll dive deep into the Rheem water heater drain valve replacement procedure in just a second. But before that, here’s a quick list of all the tools you’ll need to do the replacement job:
- The replacement drain valve.
- An adjustable wrench.
- Flat blade screwdriver.
- A garden hose.
- Teflon tape.
- Rags or towels.
Make sure the replacement drain valve you get is the right one for your heater. Go to Rheem water heater drain valves and pick the right one for you. Once you have your hands on all these tools, you can follow these steps to replace the drain valve:
Step 01 – Shut Off The Heater
You should shut off the power to the water heater at the circuit breaker. If you have a gas-powered water heater, you should also turn off the gas supply. You can do it by turning the knob to the “Off” position.

If you want to be extra safe, you can also turn off the gas shut-off valve. Before you do anything else, you should wait for the water inside the heater to cool down. Then, you can proceed further.
Step 02 – Turn Off The Water Supply
Turn off the cold water supply as I’ll be draining the tank soon. You don’t want the tank to get refilled. After you do that, open a hot water faucet to relieve the pressure inside the tank.
Step 03 – Drain The Tank
Attach one end of a garden hose to the drain valve in your heater. The drain valve will be located at the bottom of the tank. It’ll usually be made of either plastic or brass in most cases.

Place the other end of the hose to a floor drain in your house. You can also extend that end to outside your home if you don’t have a floor drain nearby. But don’t use a bucket. There’s too much water in the tank. That’ll overfill the bucket.
Now, you can open the drain valve and let the water drain from the tank. If you hadn’t waited for the heater to cool down, the water would be hot. So, make sure that nobody gets close to it.
You may even see white particles coming out at the other end of the garden hose. Those are sediments. If water no longer comes out of the hose, that means you have drained the tank. Now, you can close the drain valve all the way and remove the garden hose.
If the water isn’t coming out of the tank at all from the start, that’s a big issue. You can scroll down and see the section where I have detailed instructions on how you can resolve that situation.
Step 04 – Remove The Old Drain Valve
Now, it’s time to remove the old drain valve. Keep in mind that additional water can come out of the tank when you remove it. So, place a few rags or towels under the drain valve to prevent water spillage.
Use the adjustable wrench to remove the old drain valve. If you rotate it counterclockwise with it, the drain valve will come loose.

If you have a plastic drain valve installed, it may break if you put pressure on it with the adjustable wrench. So, be careful and gentle while removing it. But if it’s already broken, scroll down to the section where I tell you how to solve that issue.
You won’t face this issue with brass valves as they don’t break easily. After a few turns with the wrench, you’ll be able to rotate it by hand. Keep going at it until you remove the drain valve from the tank.
Step 05 – Install The New Drain Valve
Before installing the new drain valve, attach Teflon tape to seal the threads in it. Give it at least six wraps of tape before you install it. Clean the threads inside the tank as well using a wired brush. Then, you can put it in place of where the old drain valve used to sit.
You can tighten it by hand at first. Then, you have to take the adjustable wrench and rotate it clockwise. Once it’s tight and secure in its place, make sure it’s in the closed position.
Step 06 – Fill The Tank
Now that you have completed the installation of the new drain valve, it’s time to refill the tank. Open a hot water faucet at first to relieve the pressure inside the tank once again.
Then, you can open the cold water supply. The heater will start to fill. Once you have a steady stream of water from the hot water faucet that’s open, you can turn it off.
Step 07 – Check For Leaks
As the tank gets filled up, check if there are any leaks. If water leaks through the drain valve or from that area, you didn’t install the drain valve correctly. You can tighten it or remove it and go through the installation again until there’s no water leaking from it.
If there are no leaks, you can turn on the power to the heater. For gas-powered heaters, you have to turn on the gas supply, relight the pilot, and set the heater to your desired temperature.
Make sure you light the pilot properly. You can check out my Rheem pilot light guide if you’re having any issues with it. You’ll find all the common problems and solutions about the pilot light there.
What Should You Do If Rheem Drain Valve Isn’t Draing Water?
Now, it’s rare that you’d face this issue. But I want to make you prepared for everything. If the water drains from your tank, then you can replace the drain valve without a hitch.
But sometimes, you can be in the odd scenario where the water won’t drain through the drain valve. The first thing you need to understand is why it’s happening. It’s due to sediment build-up in the tank. There are sediment pieces that are blocking the water from going to the drain valve.
So, how do you solve it? You have to break through the sediment. You can do it by using a process called a backflush. Follow these steps to do it:
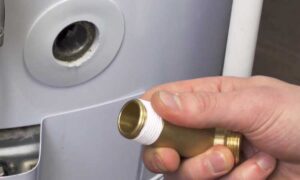
- Connect a washing machine hose to a threaded faucet in your house.
- Attach the other end of the washing machine hose to the open end of the garden hose. You may also need an adapter to do it at times. Here’s how it’ll look when they connect directly:

- Open the faucet for a few seconds. That should give enough time to blast water into the tank and break through the sediments.
- Disconnect the washing machine hose and see if water is draining from the drain valve now.
- You may have to attach the washing machine hose and do the backflush a few more times. It all depends on how much sediment there is in the tank.
What To Do If Rheem Plastic Drain Valve Breaks?
The plastic valve breaking is another unwanted issue you can run into when replacing the drain valve. The plastic valve has a chance of breaking when you try to loosen it using the adjustable wrench.

The breaking of the plastic valve isn’t an unfixable issue. But you’ll need a few more tools to remove it if it breaks. The three main things you need to break the plastic drain valve free are:
- A small open-ended hacksaw.
- A pair of needle nose pliers.
- A flat-blade screwdriver.
Use the hacksaw to cut through the plastic. Make sure you don’t cut into the metal threads of the tank. Next, use the screwdriver around the outer edges of the drain valve to pry the plastic loose.
Once the pieces become loose, you can grab them using the pliers. Remove them one by one until there are no longer any plastic pieces remaining.
How To Flush The Tank?
When you have an empty tank, it’s a golden opportunity to remove the sediments from it. Especially, if your tank has a lot of mineral deposits inside it. The process of doing it is also really easy.
Turn on the cold water supply for about half a minute so that some water goes inside the tank. This water should lift the sediment. You can drain the water and see the sediments coming out at the other end.
You can repeat the process as many times as you need. The goal is to see clear water coming out at the other end of the garden hose. Once you have clear water, that means the sediment has cleared. You can close the drain valve and disconnect the hose to complete the job.
It’s a good idea to flush your tank at regular intervals to keep the sediments from piling up. The right frequency depends on the level of hard water supply in your area. Sometimes, you can do it once a year and get away with it.
You may have to do it 3-4 times a year depending on the hard water supply. Once you get an idea of the hard water supply, you’ll know the right interval for flushing the tank.
FAQs:
How long does it take to replace the drain valve?
Replacing the drain valve isn’t a time-consuming process if you know what you’re doing. You can get it done in less than half an hour if you follow the steps mentioned in this guide.
Should you try to repair the drain valve?
It’s not easy and always possible to repair the drain valve. On top of that, new drain valves are cheap and easy to replace. So, replacing them makes more sense for anyone.
Why is hot water heater leaking from the drain valve?
You’re most likely using hot water and your water heater is still heating the water. If the heater is off now, it must have been used recently. That’s why you have hot water leaking from the drain valve.
What is the most common Rheem water heater drain valve size?
The standard size of drain valves in most Rheem gas waters is 3/4 inches. Most heaters will have this drain valve. But you can call Rheem, tell them about your model, and they’ll tell you the exact size you need.
What is the Rheem water heater drain valve replacement cost?
Most brass drain valves cost between $15-$20. That’s all you need to replace it on your own along with the tools I talked about. But if you hire a technician to do it, it’ll easily cost upwards of $100.
Conclusion
Now, you know how to replace the Rheem water heater drain valve correctly. As you may have noticed, you don’t need any fancy equipment or years of expertise to do it.
Anyone with the capability of following basic instructions can replace the drain valve on their own. Hopefully, you’ll be able to easily replace your drain valve without any major issues after following this guide. Check out my Rheem chamber sensor failure guide in case you want to replace it.