The main reasons why the Rheem water heater pilot light keeps going out according to my many years of observation are:
- A clogged filter grate.
- Thermopile issues.
- Tripped combustion shut-off device.
- Defective gas control thermostat.
- Faulty emergency cut-out device.
- Thermocouple issues.
I’ll talk about how you can fix each of these issues in detail so that the pilot light in your heater stays lit. You’ll also learn how you can light the pilot properly. So, let’s dive in!
Table of Contents

Rheem Water Heater Pilot Light Keeps Going Out [Fully Fixed]
There are different types of gas control valves in different Rheem gas water heaters. The real reason that your heater’s pilot light won’t stay lit could vary depending on the gas valve your heater has.
That’s something you should be aware of. With that said, some of the reasons are also common for all types of gas valves. So, let’s start looking at the main reasons why your Rheem heater’s pilot light keeps going out.
01. Clogged Filter Grate
This is the most common issue in the newer gas valves. If you’re not sure what the newer gas valves are supposed to look like, here’s a picture to help you out:

There’s a high chance that the filter grate in your heater is dirty and that’s keeping the pilot light from staying lit. As you would know, there needs to be enough combustible air for the pilot to light up and stay lit.
When the filter grate gets dirty, air can no longer pass to the pilot light freely. Even if the gas supply is sufficient, the pilot light won’t stay lit due to the lack of air. That’s what’s most likely happening here and why your pilot light continues to go out.
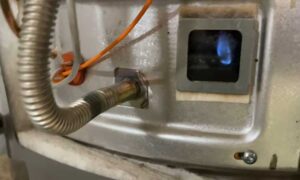
But you don’t have to do any guesswork here. You can simply look through the viewport at the burner access door. If you see that the filter grate is dirty through the viewport, you’ve found the issue.

How To Fix:
Thankfully, there’s a simple fix to this complicated problem. All you need is a brush to clean the filter grate. Make sure you turn off the gas supply to the water heater and wait for it to cool down. As you’d be working close to the burner area, it’s safe to do that to avoid injuries.
You can insert the brush into the filter grate while going under the heater. The filter grate can be located on the sides of some heaters. For those heaters, you can work from the sides.
The goal is to get out as much of the dirt as you can. Make sure you do a thorough cleaning job. You can look through the viewport to see in real-time how much dirt you’re removing.
After you’re done cleaning the filter grate, relight the pilot and see if it stays lit. If the pilot still keeps going out, that means there are other issues with it as well. In those rare cases, you need to keep on diagnosing.
02. Thermopile Issues
Another common reason behind the pilot staying lit in the heaters with the newer gas valves is thermopile problems. If the thermopile is defective or disconnected, it can cause this issue.
When the pilot is lit, the thermopile gets heated. The thermopile generates a small amount of electricity and signals the heater to keep flowing the gas. But if the thermopile doesn’t sense the flame, the gas supply will be solved. So, the pilot light goes out.
First, inspect the connection of the thermopile at the gas control thermostat. The connection between the thermopile and the connectors should be tight. There should be no damage to the thermopile wiring.
Even if the connections are tight and normal, the thermopile could still be faulty. Thankfully, you can easily check it with a multimeter. This test will only work if you can light the pilot. Follow these steps to test the thermopile:
- Turn the gas control knob to the “Off” position and wait for the heater to cool down. Set up your multimeter to DC and set the range to millivolts.
- Disconnect the thermopile wiring connector from the gas control valve. Rock it back and forth to remove it and make sure that you don’t cause any damage to it.
- Connect the red lead of the multimer to the red positive wire of the thermopile. The black lead will go to the white wire of the thermopile.
- Try to light the pilot by following the right instructions. You can scroll down below and find the detailed section where I’ve discussed how to properly light the pilot.
- You’ll notice that the temperature will continue to rise up as the thermopile is heated from the pilot light. Keep pressing the gas control knob until the maximum voltage is reached. You may have to hold it down for 2-3 minutes. Note down the reading.

Now, comes the moment of truth. If you have a good thermopile, the reading should be within the range of 650-850 millivolts. If the reading is outside that range, you have a bad thermopile.
How To Fix:
If the thermopile is loose, you can tighten the connection to solve the issue. Replace the thermopile wiring if it is damaged in any way. But more often than not, the thermopile will be defective. You’ll have to replace the thermopile in those cases.
Replacing the thermopile is an easy process. You’ll be able to do it on your own even if you have little experience working with heaters. Follow these steps to replace the thermopile in your Rheem gas water heater:
Step 01 – Remove The Gas Valve Attachments
Shut off the gas supply to your Rheem water heater and set the gas control knob to the “Off” position. Remove the outside burner door to expose the main burner door and the other components. Disconnect the igniter and the thermopile wiring from the gas control thermostat.

Remove the burner gas supply and the gas tube connections. Make sure you use the wrenches of the right size. Otherwise, the connectors can get easily stripped as they’re made of brass. Make sure you don’t bend the pilot light when removing it.
Step 02 – Isolate The Pilot Assembly
Take off the screws holding the main burner door in place. Gently glide out the burner assembly. Pay attention so that you don’t damage the main burner. Remove the retainer clip that holds the different components in place. You can slide a large flat-blade screwdriver into the clip and turn it to remove the clip.
Take off the screw that holds the pilot assembly and the pilot shield in place. Disconnect the wiring that goes to the thermal switch. Feed the pilot tube and wiring through the burner door to remove the pilot assembly.
Step 03 – Replace The Thermopile
Release the retaining clip holding the thermopile in place using a flat-blade screwdriver. Then, you can easily slide the old thermopile out. Take the new thermopile and slide it to the right position.
From there on, you have to reverse-engineer everything you have done so far to complete the thermopile replacement job. Once you replace the faulty thermopile, the pilot light in your heater should stay on without any interruption.
03. Tripped Combustion Shutoff Device
There’s a safety device in Rheem gas water heaters called the combustion shut-off device. It shuts off the water heater if the combustion conditions aren’t desirable.
Things like the presence of flammable vapors or blockage of the air inlet openings will cause this device to trip. The pilot won’t light and you won’t be able to use your heater in this condition.
How To Fix:
The tripping of the combustion shut-off device can be a serious issue. Especially, if there are flammable vapors involved. So, an average DIYer shouldn’t attempt to do anything here.
I recommend hiring a qualified technician to inspect the combustion shut-off device and take the appropriate action. You can’t do everything on your own. And this is one of those jobs that are better left to the experts.
04. Defective Gas Control Valve
The gas control thermostat is responsible for sending the gas to the pilot light. No matter which type of gas valve you have, a faulty gas control valve can cause pilot light issues. The safety magnet device in the gas control valves being defective can also cause this problem.

The pilot may not even light up in most cases. But sometimes, the pilot can light but keep going out due to abrupt gas supply issues. The method of checking the gas valve depends on the type you have. If it turns out to be faulty, you’ve found the main culprit behind the issue.
How To Fix:
If you have a bad gas control valve, your only option is to replace it. Luckily, I have a guide that’ll show you how to replace the gas control valve in Rheem water heaters with all the details. Hopefully, your heater’s pilot light will stay lit after replacing the gas control thermostat.
05. Faulty Emergency Cut-Out Device
The first three issues I discussed are common for the newer gas valves that have status lights. But there are heaters with gas valves of other types as well. Here’s a picture of the type of gas valve I am talking about:

If your gas valve looks like that, the emergency cut-out device will be at fault in most cases. It’s a safety device that’s designed to shut off power to the heater when the water temperature inside the tank gets too hot. It keeps the tank from exploding and protects the user from scalding.
So, where is this device? It’s connected to the thermocouple. If you remove the thermocouple from the gas control valve, you should see a white connector there. If you’re still unsure of what to look for, look at this picture below:

There are two wires that go to the emergency cut-off device. The problem with these devices is that they’re faulty in most Rheem heaters. And they can get tripped for no reason. When they get tripped, the gas supply to the pilot will be stopped and the pilot light will go out.
How To Fix:
You can cut the wires, strip them off, and tie them together to bypass this safety device. You can also use a small nail, hold it in place of the connector, and reconnect the thermocouple. Here’s what it should look like:

If you can relight the pilot and it stays on, then you can be sure that the cut-out device was at fault. Remember that bypassing it isn’t a good long-term solution. It’s placed for a safety reason and the ideal thing to do is to replace the faulty component.
It’s only a temporary solution if you need hot water urgently. You can contact Rheem if your unit is under warranty and they’ll send you the replacement part. Once that arrives, you need to get the replacement job to use your heater properly and get hot water again.
06. Thermocouple Issues
If the cut-off device was okay, there’s a strong chance that there are issues with the thermocouple in your heater. The thermocouple works in the same way as a thermopile. It senses the small flame from the pilot light and signals to keep supplying gas.

The electricity produced by the thermocouple is between 20-30 millivolts. It’s less than the voltage in a AA battery but it’s more than enough to signal the gas valve to keep supplying gas.
The thermocouple also works as a safety unit. When the pilot light goes out, there should no longer any gas be supplied to it. The thermocouple makes sure of that. The thermocouple sends less electric current as the pilot light cools down and eventually cuts off the gas supply. So, there’s no leak.
If the thermocouple stops sensing the flame for any reason, the gas supply will be stopped and your pilot will go out. So, how do you know whether you have a bad thermocouple? Luckily, I got you covered.
How To Test A Rheem Gas Heater Thermocouple?
Here are the tools you’ll need to test the thermocouple:
- A screwdriver.
- Some dish soap.
- An adjustable wrench.
- A small brush.
- A multimeter.
- Alligator test leads.
Once you’ve got your hands on these tools, you can do a quick voltage test on the thermocouple. Follow these steps to do it:
- Set the gas control knob to the “Off” position.
- Remove the bottom cover to access the viewport.
- Set the multimeter to the DC option.
- Unscrew the thermocouple from the gas control valve using the adjustable wrench. Connect the black probe of the multimeter to the copper part and the red probe to the end of the thermocouple. Here’s a picture to help you how it should look:

- Light the pilot and notice the voltage of the thermocouple rising.
- Note down the reading.
A healthy thermopile should read in the range of 20-30 millivolts in such an open circuit test. If the reading is outside that range, there’s a high likelihood that your pilot isn’t staying lit due to thermopile thermocouple issues.
Now, issues with the thermocouple don’t necessarily mean that it’s bad. It can occur in any of the following things:
i) Bent Or Kinked Thermocouple
If you’re facing this issue in a relatively new heater, there’s a high possibility that the thermocouple is bent. The thermocouple needs to sit in the right position so that it can sense the flame from the pilot.
But the thermocouple has most likely gotten bent or kinked during shipping. So, it may be displaced from the position it’s supposed to be in. That’s why it can’t sense the flame from the pilot properly and the pilot keeps going out.
ii) Dirty Thermocouple
As you use your water heater, the thermocouple will get dirty with time. When too much dirt and debris build up on the thermocouple, it may no longer be able to sense the pilot flame. And you should know what happens next by now if you’ve read this far.

The gas supply to the pilot will be shut off and the pilot will go out. This issue is common in heaters that have been used for a while rather than completely new ones.
iii) Defective Thermocouple
If the thermocouple isn’t dirty or kinked, it’s most likely defective. It makes sense if you have been using your heater for a while. The thermocouple can also be broken if it has been used for a prolonged period.
How To Fix:
Now the right fix to deal with the thermocouple issues depends on what’s actually causing the problem. If the thermocouple is bent or out of shape, it can be readjusted and realigned. When it senses the flame from the pilot properly, the pilot light will stay lit.
Secondly, if you have a dirty thermocouple, you need to clean it. You can use fine-grit sandpaper or emery cloth to do this job. Once you get the dirt out of the thermocouple, it will read the pilot flame properly. You’ll be able to run the heater without any issues in those cases.
Finally, you’ll have to replace the thermocouple if you’re dealing with a broken or defective thermocouple. Fortunately, it’s an easy job to replace the thermocouple and you can do it on your own. The next section will walk you through this process with all the details.
No matter which type of fix you have to do, you’ll have to remove the main burner assembly and isolate the thermocouple. You can realign it if it is bent. You can clean it if it’s dirty. And you’ll have to replace it if it’s bad. But either way, you’ll have to take it off first to diagnose and correct the issue.
How To Replace Rheem Gas Heater Thermocouple?
If you have a bad thermocouple, your only option is to replace it. You can follow these steps to replace the thermocouple on your own:
Step 01 – Turn Off The Heater
First, set the gas control valve to the “Off” position. Turn off the main gas supply to the heater. You can do it by turning the gas control shut-off valve fully perpendicular to the gas lines. Wait for the heater and the main burner to cool down.
Step 02 – Remove The Main Burner
The second step is to remove the main burner. You’ll have to remove all the gas control valve connections to do that. You can start by disconnecting the igniter wire from the gas valve. Remove the wires from the thermal switch if your heater has that component.
Use an adjustable wrench to unscrew the thermocouple at the gas control valve. Remove the pilot tube connection and the main burner gas supply as well by following the same method. Make sure you’re gentle and don’t bend anything while doing it.
Remove the screws holding the main burner door in place. Then, you can slide out the main burner assembly without any issues. Again, be careful while doing it, and make sure you don’t damage anything in the process.

Step 03 – Replace The Thermocouple
You’ll have to unscrew the pilot assembly to remove the thermocouple in most heaters. Use a screwdriver to undo the screw that connects the pilot assembly with the rest of the burner assembly.
Separate the plug that holds the wire in place. You can now feed the pilot tube and the other wires through the main burner door. Isolate the thermocouple wire from the plug.
Slide the thermocouple out of the housing if it uses a push fitting. Other models could have a screw fitting. You’d have to undo a screw to remove the thermocouple in those cases.
Make sure the new thermocouple you have is the same length as your old one. You can measure them both to confirm it. Secondly, try to get a thermocouple with multiple adapters so that you won’t have to worry about the right fit.
Slide the new thermocouple into the pilot housing and make sure it’s secure in its place. Then, you can reverse-engineer the above steps to complete the installation.
Make sure you don’t damage any of the connections at the gas control valve so that the heater can work properly. Don’t overtighten any of the nuts as doing so can make them stripped. Light the pilot and see if the heaters work properly. Hopefully, your heater will work fine again after you replace the thermocouple.
The final thing you have to do is to test for gas leaks by applying some soapy water to the gas valve connections. If bubbles form, it means there’s a gas leak at that particular point.
You can tighten the connection to stop the gas leak. If you don’t see any bubbles forming, there are no gas leaks. In that case, you don’t have to do anything else as the replacement job is complete.
Why Rheem Gas Water Heater Pilot Won’t Light?
All the issues you’ve learned so far about why your pilot light goes out after it’s lit. But what if you can’t light the pilot in the first place? There are many potential reasons why the pilot won’t light up.
I’ll talk about those reasons in this section. The most common reasons why the pilot won’t light in Rheem gas water heaters are:
i) Gas Supply Problems
Without a proper gas supply, the pilot won’t light up. The most common gas supply problems are:
- Not turning on the gas supply fully.
- Air or obstruction in gas lines.
- Kinked flex tube.
Make sure the main gas shut-off valve is fully parallel to the gas lines. You need to purge the air from the gas lines if that’s causing the issue. Clean or replace the gas lines if they’re dirty. Straighten out the flex tube if it’s kinked. If that doesn’t work, you’ll have to replace the flex tube.
ii) Pilot Light Issues
If the pilot won’t light, it’s not uncommon for the issue to lie with the pilot light itself. The common issue here is that the pilot tube can be pitched. Pinched. The pilot orifice is clogged. Besides, a faulty igniter won’t produce any spark. That can also keep the pilot from lighting.
You need to diagnose the issue and take corrective actions here. You may have to replace the entire pilot assembly depending on the severity of the issue.
iii) Inadequate Combustible Air
The pilot won’t light without proper combustible air. Here are the most common reasons why it can happen:
- The filter grate is clogged.
- The heater is installed in a confined space.
- The area around the heater is dirty and blocking the airflow.
You need to dial down on what’s causing the issue. Then, you need to follow the appropriate fixes to light the pilot again.
Apart from those common issues, there are also other things that can cause issues with the pilot light. Here’s a quick mention of them:
- A faulty gas control thermostat.
- Electrical wiring issues.
- Not knowing how to light the pilot properly.
How To Light Rheem Gas Water Heater Pilot Light Correctly?
You have to follow the pilot lighting instructions properly if you want to light the pilot. Otherwise, the pilot may not come on at all or it can go out very quickly. Before I move on to the steps on how you can light the pilot, make sure you follow these safety precautions:
- The pilot has to be lit using the piezo-electric spark gas ignition system. Don’t take off the burner cover and try to light the pilot by hand or using a match.
- Smell the area close to the heater for gas leaks before lighting the pilot. If you can smell gas, evacuate your house immediately and call the gas supplier from outside. If there’s no smell, you can move on.
- You’re only supposed to use your hand to control the gas control knob. Don’t use any tools for this job.
- If the unit has been under water due to any flooding issue, don’t attempt to use the heater in that condition. Have a qualified technician check out the heater and follow his instructions. The unit will have to be replaced in most cases.
Now that you’re aware of the safety measurements when lighting the pilot, you can follow these steps to do it:
- Set the gas control knob on the thermostat to the “Off” position. Wait for a few minutes for the gas to clear out before you try to light the pilot.
- You can remove the outer burner door so that you can look through the viewport and check the status of the pilot light. Locate the igniter button that’s placed below the gas control knob in the thermostat.
- Rotate the gas control knob to the Pilot position and press it down. Use your other hand to keep pressing the igniter button repeatedly. You can do this for one and a half minutes. The status light will start to blink once every three seconds when the pilot light is on.
- You can confirm whether the pilot light is on by looking through the viewport. If the pilot light comes on, you can let go of the gas control knob and set the knob to your desired temperature. Then, put the outer burner door back in its place.
- If the pilot light doesn’t come on even after 90 seconds, you can try again after a few minutes. Just make sure that there are at least 10-minute breaks between each attempt. If you can’t light the pilot even after that, there are other issues that are keeping the pilot from lighting up.
You already know what some of those issues could be if you’ve followed this guide so far. If you still can’t get the pilot to light up even after fixing those issues, you need to consult a qualified technician.
Can be added.
VI. Preventive Maintenance for Rheem Water Heaters
A. Tips for maintaining a stable pilot light
B. Regular inspection and cleaning of critical components
C. Importance of professional maintenance checks
FAQs:
Can a strong wind blow out the pilot light?
It’s possible for a strong wind to extinguish the pilot light. If it does happen, you should be able to relight the pilot easily and retain it. The pilot light shouldn’t keep going out due to this issue.
Is the red flashing of the status light dangerous?
The red flashes of the status light indicate that there’s something wrong with your heater. If you look at the thermostat and compare it to the number of flashes, you’ll find out the problem. Then, you can take corrective actions.
How long does a thermocouple last on average?
It depends largely on how well you maintain your heater and clean the main burner. If you take good care of your heater, a thermocouple can last up to a decade.
How do you know if the thermopile voltage is low?
The status light in Rheem gas water heaters blinks twice to indicate low voltage from the thermopile. It’ll either be loose or faulty. The solution here is to clean it or replace it altogether.
Conclusion
There aren’t too many many feelings that are worse than not getting hot water on a cold day. Unfortunately, you’ll face that issue if the Rheem water heater pilot light keeps going out and the main burner doesn’t come on.
Hopefully, you’ll find this guide helpful in diagnosing the problems that cause this issue and fixing them as well. Visit my Rheem gas heaters troubleshooting guide if you’re facing other issues with your heater.