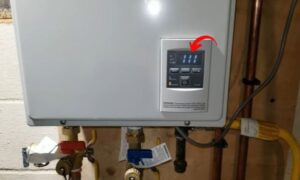
All water heaters are bound to show some tantrums from time to time no matter how good the brand is. In this case, the good thing about Takagi tankless water heaters is, they show error codes that indicate what problem they are having.
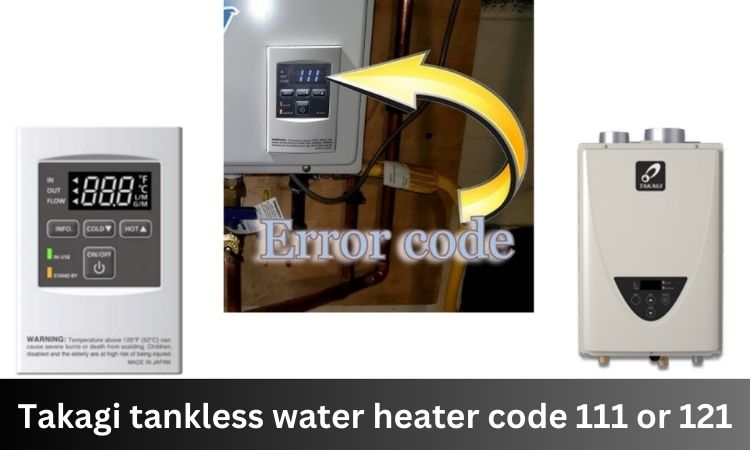
So, Takagi tankless water heater code 111 or 121 – what does it mean?
It means the water heater is facing problems with ignition or loss of flame. To solve this issue,
- Ensure proper gas supply pressure
- Fix the high-limit switch
- Ensure there is no blockage in the vent
- Fix the main gas valve
There are some other things you need to check and fix like the plastic tube connections and spark in the burner chamber.
From my experience with troubleshooting Takagi water heaters, I can ensure that this article should be enough to solve your problem. So keep reading!
Table of Contents
Takagi Tankless Water Heater Code 111 Or 121 or Ignition Failure
Takagi tankless water heaters operate by gas power. So, these tankless water heaters commonly have ignition or flame-related issues. In this case, the tankless water heaters automatically show some error code in the remote control, with green lights flashing on the monitor.
The error codes are different for different problems so that it’s easy for you to diagnose and fix the issue. Error codes 111 and 121 are both common in almost every model of Takagi tankless water heaters. Here are the models in which you are likely to get these codes.
- H series
- 140 Indoor and Outdoor
- CT-199
- 910/910 ASME
- CX3 Series
- Series 110
- 540P (Indoor and Outdoor)
- HX3 series
According to the user manual of all these models, the reason and solutions for error codes 111 and 121 are similar in all of them. So, whichever model you have, read the next segment and find out the solutions.
Takagi Tankless Water Heater Code 111 Or 121 Detailed Discussion
Your water heater has tried three times to start heating but couldn’t, possibly because of a problem inside the heater or no gas supply. In that case, you will notice the error code 111 in the controller.
On the other hand, during a heating cycle, your heater loses its flame and can’t restart after three attempts. Like Code 111, it can reset itself if the water flow stops or there’s a power interruption. But in this case, the error code 121 will appear on the controller.
When one of these error codes appears in your Takagi water heater, you will notice 3 green flashes on the LED screen. This error code will reset itself if you turn off the water or the power after fixing the issue.
Reasons:
The reason behind this error code 111 appearing in your Takagi tankless water heater is ignition failure. On the other hand, the reason behind the error code 121 in your Takagi tankless water heater is a loss of flame in the heater. So, when you get these codes, that means your Takagi tankless water heater is not igniting.
How To Fix It?/ Ignition Failure
Luckily, you can get rid of both these codes using the same troubleshooting methods. There are a number of troubleshooting tasks you have to perform to get rid of these codes. Here are those tasks.
i) Check The Gas Supply Pressure
First, you need to check that the gas pressure, which is the force that pushes gas into your water heater, is within the recommended range when the heater is not actively heating water. If the pressure drops below the minimum required when the heater is trying to ignite, it can cause problems.
There are some other things you have to check here.
- Make sure there’s no debris or blockage in the gas line. Any clogs can disrupt the flow of gas to your water heater.
- Your heater has a device called a pressure regulator. If it’s not working correctly, it can cause issues. Make sure the pressure regulator is working properly.
- If you use propane instead of natural gas, be aware that on colder days, the regulator (a device that controls gas flow) can get cold. This might lead to problems. You can tell if this is happening if the gas pressure drops more than 1 to 1.5 inches of the water column when your water heater is running at full capacity (when all your hot water taps are on).
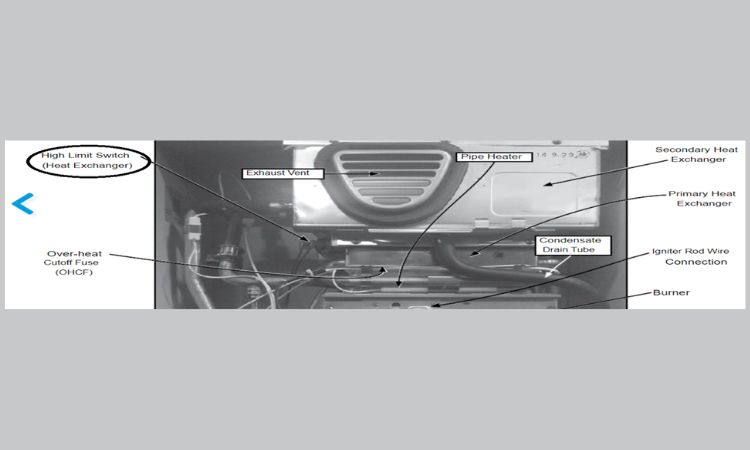
ii) Check High Limit Switch and Overheat Cutoff Fuse
To check and fix the high-limit switch and overheat cutoff fuse, you have to follow the steps mentioned below.
Step 1: First, turn off the power to your water heater, then turn it back on using the switch located above the computer board. Listen carefully for “clunking” noises coming from the gas solenoid valves. If you hear these sounds, move on to step 3.
Step 2: If you didn’t hear the “clunking” noises and the heater is still off, disconnect the power by either unplugging it or using an external switch.
Step 3: Find the high-limit switch. You can refer to the following picture for better visual guidance.
Step 4: Turn the power back on and test the water heater. If the burner successfully lights, it means that there was a specific reason for the high-limit switch to trip. In this case, you need to continue with the troubleshooting process to identify and resolve the underlying issue.
Step 5: If the high limit switch trips again after resetting, it might be necessary to descale the water heater. Also, make sure to check the temperature of the incoming water supply.
If your water heater is supplied with water that’s already pre-heated, such as from a solar system, the incoming water temperature may be too high. If descaling and temperature control do not solve the issue, you might need to replace the high-limit switch.
Step 6: If the high limit switch appears to be functioning correctly, and you still haven’t heard the “clunking” noises from the gas valves, proceed to check the overheat cutoff fuse (OHCF) for continuity. If you find there is no continuity or need instructions on how to test the OHCF for continuity.
iii) Check For Vent Blockages
Check and make sure that nothing is blocking the vents of your Takagi tankless water heater. This will include things like bird nests, small animals, or even debris like trash. If any of these things are clogging up the venting system, it can lead to problems.
The solution is to inspect your venting system and remove any obstructions you find. When your vents are clear, your water heater can operate properly.
iv) Check The Plastic Tube Connection
It’s important to make sure that the clear plastic tube that links the proportional gas valve to the combustion chamber is securely attached.
Here’s how to do this.
Step 1: First, locate the clear plastic tube. It’s usually a see-through tube that connects different parts of the water heater.
Step 2: Carefully inspect the tube to ensure it’s properly connected at both ends. You should see it attached to the proportional gas valve and the combustion chamber.
Step 3: If you find that the tube is loose or disconnected, gently reattach it. Make sure it’s fitted securely at both ends.
v) Check For Spark In The Burner Chamber
You have to make sure that a spark is happening inside the burner chamber between the spark electrode and the burner. Because the burner can sometimes fail to light or lose flame during heat demand and during those times, there won’t be any steady sparks.
You can see this spark through a sight glass located next to the igniter and flame sensor. A strong, steady, and blue spark is what you’re aiming for, while a weak spark might jump around or not appear at all.
To ensure this, follow the process given below.
Step 1: If you can’t spot a spark or if the spark appears weak, start by examining the purple wires that connect the igniter. These wires link the igniter to both the igniter unit itself and the computer board. To fix this issue, disconnect these wires and then reconnect them to establish a clean and secure electrical connection.
Step 2: Take a look at the igniter rod. Ensure that the black wire is correctly attached, and check to see if the rod is firmly in place without any movement. If you find that the rod moves, it’s necessary to replace the igniter rod, and you’ll also require a rod holder gasket. A broken ignore rod can be a reason for the chamber sensor failure as well.
Here’s how to Replace the Takagi Tankless Water Heater Igniter and fix it from not working.
- First, turn off the water heater by removing the power sources to avoid any accidents.
- Next, take off the cover of the water heater. Four screws are holding it in place. It’s a good idea to remove the bottom screws as it makes taking the panel off easier.
- After that, lift and pull out the user interface module. It’s connected to the control board with a single wiring harness. Carefully disconnect this wiring harness from the control board.
- The next thing to do is remove the flame rods. There is a catch on the AFR (Air-Fuel Ratio) rod that you need to press to release it. Slide the wire off the flame rod and slide the protective boot back onto the spark wire to keep it safe. Remove the spark wire as well.
- Now, it’s time to remove the igniter. The igniter is held in place with a single screw. It’s usually located in the upper right-hand corner of the heat exchanger. You’ll see a purple wire connected to the control board. Unplug it from the control board and pull it out.
- Once the old igniter is removed, take the new igniter and position it in the same spot where you removed the old one. Secure it in place using the single screw you previously removed.
- Plug the purple wire from the new igniter back into the control board. Make sure it’s securely connected.
- Slide the spark wire and protective boot back onto the spark rod. Then, reconnect the AFR rod by sliding the wire back onto it.
- Insert the user interface module back into its place. Ensure that the single wiring harness is securely connected to the control board.
- Finally, put the cover back on the water heater. Secure it with the screws, beginning with the bottom ones and then moving on to the others. Tighten them to hold the cover in place.
After reassembling everything, turn on the main gas valve connected to the Takagi water heater and plug it back into the electrical outlet. Test the water heater to ensure it’s functioning correctly.
Step 3: While the igniter is sparking, check the voltage across the purple wires that are connected to the igniter. The normal voltage range should be between 108-132 VAC. If the voltage falls outside of this range, it’s an indication that the computer board might need replacement.
Step 4: If you’ve gone through the previous steps and still can’t get a spark to generate, the final step is to replace the igniter itself.
vi) Check For Leaks In The Heat Exchanger
The heat exchanger is like the part of your water heater that makes the water hot. Look at the heat exchanger carefully and see if any water is coming out of it. If you see water leaking, it means there’s a problem, and you may need to replace the heat exchanger.
vii) Inspect The Flame Rod For Soot Build-Up
Look at the flame rod and see if there’s any soot on it. If there is, you should clean it carefully, so it can do its job correctly. Because error codes 111 or 12 can show up in your heater as dirty flame sensor symptoms as well. Here’s how to clean the flame sensor or flame rod for soot buildup.
Step 1: First, switch off the main gas valve that’s connected to your Takagi water heater. Also, unplug the water heater from the wall to make sure there’s no power going to it.
Step 2: After that, use a screwdriver to turn the screws counterclockwise and take them out of the case.
Step 3: Now, find the rectangular piece that covers the combustion chamber. This is called the manifold. Turn the screws counterclockwise and remove them from the manifold. Keep the manifold in a safe place.
Step 4: The damper is a thin rectangular piece with holes, and it’s behind the manifold.
Turn the screws counterclockwise to remove them from the damper, and put the damper in a safe place.
Step 5: Next, the flame sensor is in the middle of the combustion chamber.
Turn the flame sensor counterclockwise to take it out of the combustion chamber. Pull it backward to remove it.
Step 6: After removing, gently rub the outside of the flame sensor with steel wool to get rid of any build-up or deposits around it.
Step 7: Finally, carefully insert the flame sensor back into the combustion chamber. Then, reassemble the water heater by doing the previous steps.
Cleaning the flame rod will help get rid of flame sensor issues in your Takagi tankless water heater.
viii) Check For Breakage Of Wires And Burn Marks On The Computer Board
Check all the wires to make sure they are not broken, disconnected, or damaged. Also, look at the computer board, which is like the brain of your water heater.
If it has any dark or burnt marks on it, that’s not good. It means something went wrong.
If you see this, you might need to replace the computer board to make your water heater work properly again. This is a sensitive job and it is recommended to be done by a professional technician or certified Takagi dealer.
Troubleshoot Flame Going Out After 1-2 Seconds
If you notice that the flame in your water heater only stays on for a very short time, between 1-2 seconds, there are a few things you have to check and fix.
- First, look at the green IN USE LED on your water heater’s built-in controller or remote controller. If this LED is never turned on, it might indicate a problem.
- Inspect the flame sensor. This is a crucial component. If it’s dirty or covered in soot, you should clean it.
- If the flame sensor has visible damage, like chips or cracks in the ceramic part or if the metal rod is loose in the ceramic insulator, it’s best to replace it.
- Unplug both ends of the wiring harness from the igniter assembly and control board, then reconnect them. Ensuring a secure and proper connection is essential for the heater’s functioning.
- Also, make sure that the green wire, which is part of the circuit, is correctly attached to one of the screw connections around the manifold.
i) Check The Main Gas Valve (MV)
To ensure that the main gas valve is working correctly, follow the steps mentioned below.
Step 1: First, turn off the power to your water heater. This is an essential safety measure.
Check Resistance:
Step 2: After turning off the power, you’ll need to measure the resistance of the main gas valve (MV). This can be done using a multimeter. A normal or healthy MV should have a resistance reading within the range of 1.35-1.65 kilo-ohms (kΩ).
Step 3: If the resistance reading falls outside of this specified range, it suggests a problem with the gas valve. In this case, you should consider replacing the gas valve or the entire gas valve/manifold assembly.
ii) Check The Gas Solenoid Valves
To ensure the gas solenoid valves are operating correctly, follow the steps mentioned below.
Step 1: First, you must turn off the power to your water heater to ensure safety.
Step 2: Measure the resistance of the gas solenoid valves. You can do this using a multimeter.
Step 3: There are three gas solenoid valves, named SV1, SV2, and SV3.
For SV1 and SV2, a normal or healthy resistance reading should fall within the range of 1.35-1.65 kilo-ohms (kΩ). For SV3, the normal resistance range is slightly different, between 2.07-2.53 kΩ.
Step 4: If the resistance readings for any of these gas solenoid valves fall outside of their specified ranges, it suggests a problem with that particular valve.
Step 5: In the event that you find a resistance reading that’s out of range for any of the gas solenoid valves, it’s advisable to replace the affected gas valve to ensure the proper operation of your water heater. Consult a professional for this operation.
Now restart your water heater and you should get rid of the error codes.
FAQs:
What is error code 711 on the Takagi tankless water heater?
This error code 711 indicates a problem with the thermal fuse in your tankless water heater. This issue often arises when the heat exchanger gets too hot due to a lack of maintenance. Which causes the thermal fuse to break.
What is the error code 991 on a Takagi tankless water heater?
The error code 991 in the Takagi water heater points to a problem with combustion, often due to not enough air or a blocked exhaust vent. To resolve this code, you have to ensure proper ventilation and clear any obstructions.
What is error code 661 on Takagi?
Error code 661 indicates a problem with the bypass valve. To fix it, check for wire connections, scale buildup, or water leaks. Also, test the voltage between the brown and red wires to identify the issue and ensure proper functioning.
Conclusion
Now, whether you face Takagi tankless water heater code 111 or 121, you should be able to easily identify the reason and solve it accordingly. I hope this article covers all the information you need in this.
All the best with fixing your water heater. And have a nice day ahead. Goodbye.
Also, you can check out other water heater problem-related articles from our site like Takagi tankless water heater no hot water.