
Suppose, you’re out on a thrilling camping trip, enjoying the great outdoors, when suddenly you notice a steady stream of water escaping from your RV’s water heater. It’s so frustrating and you don’t know the exact reasons and solution to this problem.
So, why is your Suburban water heater Leaking? Well, the major reasons for this issue include:
- Damaged anode rod
- Not using Teflon tape
- Faulty heating element
- Issue with the pressure relief valve.
- Cracked/Fractured water tank
Aside from this, the leaking can also occur due to problems in the Inlet/Outlet connections or due to having broken fitting/clamps.
Now there are different fixes for different problems. For example, for a faulty anode rod, replace it and use Teflon tape properly. Again for the pressure relief valve leaking, fix the air pocket.
It seems a bit difficult to deal with, right? Don’t worry, I’ve covered a step-by-step guide to fixation for every problem. So, keep on reading till the end.
Table of Contents
Suburban RV Water Heater Leaking: Quick Overview
Now I’ll explore the problems & solutions but first, a quick overview table to give you a general guide on the reason and solution for suburban rv water heater leaking.
NB: The given problems, reasons, and solutions are applicable to all types of Suburban RV water heaters. However, where the frequency of the problem is higher for any specific water heater type, I’ll mention the type while discussing the problem.
| Reason | Solution |
| Damaged Anode Rod | Replace the anode rod. Consider using an aluminum anode rod for a longer lifespan. |
| Not Using a Proper Teflon Tape | Apply a pipe thread sealant, such as Teflon Tape, to the threads of the anode rod during replacement. |
| Leaking from the Heating Element | Replace the heating element. |
| Issue with the Pressure Relief Valve | Restore the air pocket in the water heater by following specific steps. |
| Problem in the Inlet/Outlet Connections | Tighten loose connections, replace cracked fittings, and fix leaks at check valves. |
| Broken Fitting/Clamps | 1. Secure the fittings and clamps properly. 2. Keep spare connections and clamps in your toolbox for replacement. |
| Rusty Tank or Tank Fracture | Replace the water heater tank. |
Reason 1: Damaged Anode Rod
One of the main reasons behind the Suburban RV water heater leaking is the damaged anode rod. The anode rod provides cathodic protection against corrosion in the tank.
Sometimes, the anode rod sacrifices itself to protect the water heater from corrosion. Again, sometimes, the resistance of water consumes the magnesium of the anode rod a lot earlier than usual.
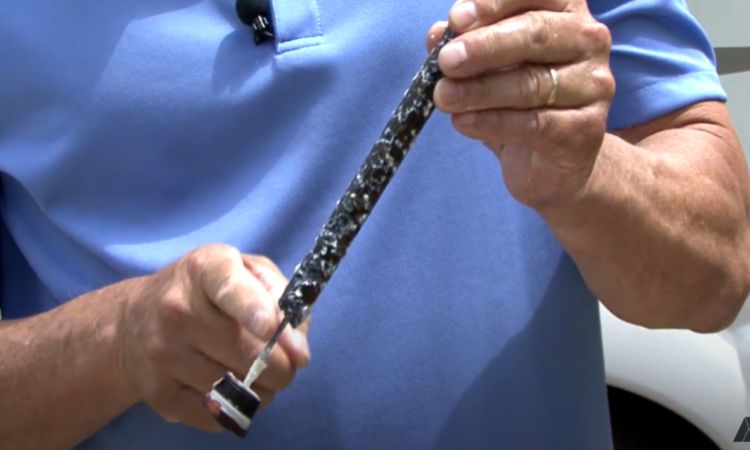
When the anode rod is consumed almost 75% or more, it can cause different issues including water leaking or dripping. To understand the anode rod is consumed check the given image. The condition of the rod will be like the image.
How to Fix It:
To fix this problem the only solution is to replace the anode rod. Below I’m suggesting a video from Suburban on how to do it.
Video 01 – SUBURBAN Anode Rod Function and Replacement
Expert tips: Now, I am suggesting a few tips on this issue for further prevention.
- The Suburban generally comes with a magnesium anode rod and the rate of magnesium consumption is comparatively higher. If you can replace it with an aluminum anode rod it’ll last longer. It’s because the consumption rate of aluminum by the water of different resistance is lower than magnesium.
- Next, annually inspect your anode rod for a longer lifespan of both the heater and the anode rod.
Reason 2: Not Using A Proper Teflon Tape
The second reason is also related to the anode rod but this is a silly one.
We have to replace the anode rod after a certain period, mostly once annually. While replacing it we sometimes forget or intentionally avoid using Teflon tape to the threads. Or sometimes we use low-quality sealant that can’t stay in place for a long period of time.
In such cases, you can experience water leaking from the anode rod.
How to Fix It:
To fix this issue, it is necessary to apply a pipe thread sealant approved for RV water heaters, such as Teflon Tape, to the threads of the anode rod. This ensures a tight seal and helps prevent water from leaking out during the replacement process.

Moreover, applying the sealant to the threads creates a barrier that helps to maintain a watertight connection and reduces the risk of leaks.
Reason 3: Leaking from the Heating Element
Over time of using the Suburban water heater, you may notice leaks in the heating element. If there is a leak from around the heating element, there can be 2 reasons, either the heating element itself is faulty or there may be damage to the threads where the heating element is installed.
How to Fix It:
In such conditions, you’ll have to observe and find out the actual source of the leak. If you get any damage to the threads, fix it.
In case the leak is specifically from the heating element, replacing the heating element is the only solution. Let’s see how to do it.
Step 1: Turn off the Power And Water Supply
First, locate the power source for the water heater and turn it off to ensure safety during the replacement process. Also, close the water supply valve to prevent any water flow.
Step 2: Release the Water Pressure
Now, find the pressure relief valve, typically a small valve, and pull it up to release some water pressure. Allow some water to flow out through the valve.
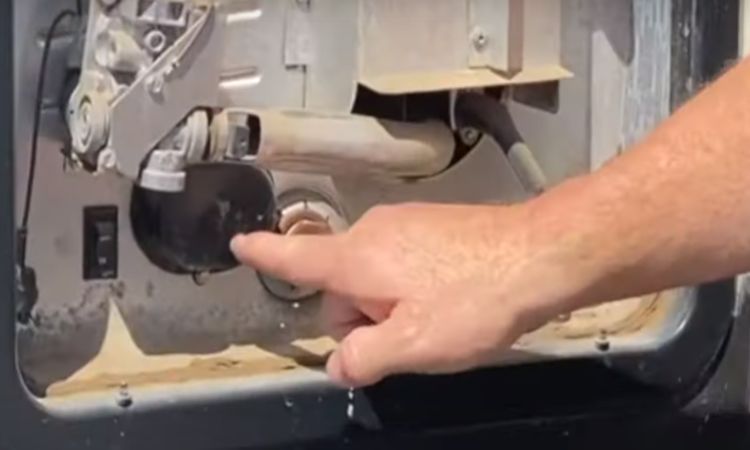
Step 3: Remove the Cap
Locate the cap covering the heating element and remove the two screws holding it in place. If you’re not sure what the cap looks like then just follow the given image.
Step 4: Loosen the Gas Line
Now, loosen the gas line connected to the water heater and move it out of the way to create space for accessing the heating element. Take caution when dealing with gas lines and ensure proper safety measures.
Step 5: Disconnect the Wires
Identify the two wires attached to the heating element and detach them carefully. Make note of their respective connections for reinstallation.

If you’re not sure about the wire, the image is in the guide. The pointed thing is the uncovered cap. Unscrew it and you’ll find the wire inside the cap.
Step 6: Loosen and Remove the old Heating Element
Use an RV tool wrench or a socket and socket wrench to loosen the heating element. Once the seal is broken, unscrew the element by hand. You can also drain the tank by opening a drain valve.
Step 7: Transfer the Gasket
At this step, move the gasket from the old heating element to the new one. Ensure that the gasket is properly aligned and seated.
Step 8: Install the New Heating Element
Now. screw the new heating element into the place where the old one was located. Make sure to tighten them securely but don’t over-tighten them.
Step 9: Reconnect the Wires
After that, attach the wires back to the new heating element. Double-check it and ensure that they are properly connected according to their original positions.
Step 10: Restore the Gas Line and Cap
Position the gas line back into place and tighten it securely. Then, replace the cap over the heating element and fasten it using the two screws.
Step 11: Turn on the Water Supply and Restore The Power
Open the water supply valve to allow water to flow into the water heater. Finally, turn the power back on to the water heater, following the appropriate procedure and safety guidelines.
Reason 4: Issue With the Pressure Relief Valve
Suburban RV water heater pressure relief valve leaking is a very common issue, maybe most common among all types of Suburban leaking problems.
Most of us think it’s a problem related to the T&P valve. But actually, it’s a problem related to the air pocket. If you notice at the top of the water heater, you should see the air pocket. For better understanding check the image below.
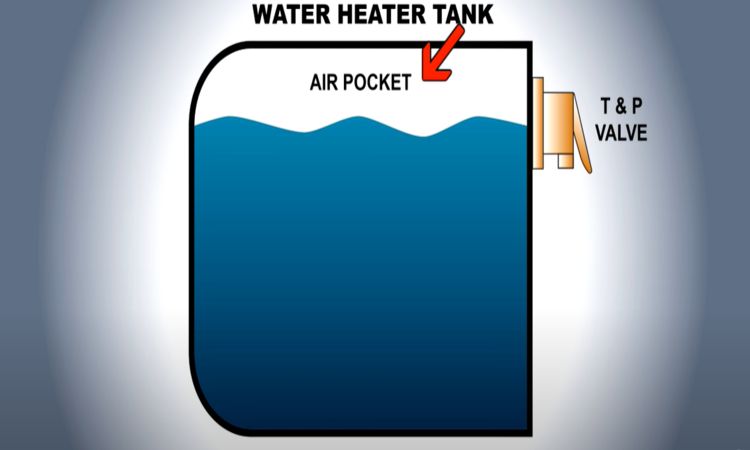
Sometimes, the air pocket in the water heater can be lost. It is the main reason behind the Suburban SW6de water heater leaking.
How to Fix It:
Here are the steps to fix the RV water heater pressure relief valve dripping issue.
Step 1: At first. turn off the water supply to the trailer. If you have city water hooked up, make sure to turn it off. Also, if the water pump is on, turn it off as well.
Step 2: Next. open the hot water faucet that is closest to the water heater.
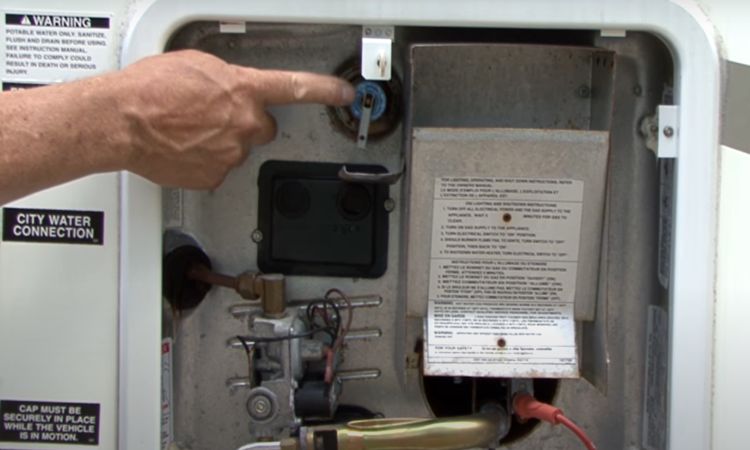
Step 3: Locate the pressure relief valve on the water heater. It is usually positioned at the top.
Step 4: Now, slowly open the pressure relief valve until water stops coming out. Be cautious as the water may be hot, so avoid scalding yourself.
Step 5: Allow the pressure relief valve to snap shut.
Step 6: Close the hot water faucet that you had opened before.
Step 7: Finally, restore the water supply to the trailer by turning it back on.
Step 8: Now check whether the problem has been resolved. The air pocket should be replenished, and the drip from the pressure relief valve should be stopped.
Step 9: If the issue continues, repeat the procedure a few more times to ensure it fixes the problem. However, in most cases, performing these steps once or twice should resolve the issue.
What If The Issue Occurs Even After Trying the Fix Multiple Times?
If you have followed the suggested steps but the pressure relief valve continues to drip, then you’ll have to install an expansion or accumulator tank in the cold water line.
This tank contains a bladder that can handle thermal expansion and release extra pressure when a faucet is turned on. These tanks are simple to install and reasonably priced, and you should find them from any local RV retailer.
Reason 5: Problem in the Inlet/Outlet connections
This inlet/outlet leaking problem isn’t very common but it can happen due to several reasons.
- First, if the connections for the hot and cold water entering and exiting of your RV are loose you can face this leaking issue.
- Again if you don’t prepare the water system for winter it may cause crack fittings and this is another reason for leaking.
- Finally, if the check valve is faulty then also the problem can occur.
This leaking issue can occur in all types of water heaters but mostly it’s seen in Suburban electric RV water heaters.
How to Fix It:
Sometimes, fixing water leaks in your RV’s water inlet/outlet connections can be easy, but it can also be challenging. It depends on where these connections are installed in your RV.
Sometimes, these connections are buried or difficult to reach. As a result, the repairing process gets more complicated. Another common place for leaks is at the water heater bypass connections.
i) Tighten Loose Connections: Check if the connections where the hot and cold water go in and out of your RV are loose. If they are, you can tighten them up to stop the leaks. You may need to access these connections from inside your RV.
ii) Replace Cracked Fittings: If the water system wasn’t prepared correctly for winter, there might be cracked fittings. These fittings are usually made of a material called PEX, and they can be replaced with something called a SharkBite fitting. SharkBite fittings are easy to install because you don’t need any special tools to use them. You can find these fittings in stores that sell plumbing supplies.
iii) Fix Leaks at Check Valves: If you see a leak coming from a part that looks like a nut, it’s probably a check valve. You can buy a new check valve from a plumbing store, a hardware store, or a big-box store. Remove the old, faulty check valve and replace it with a new one to fix the leak.
Suggestion: Depending on where the connections are located, you might be able to fix the leaks from inside your RV. But if necessary, you might have to take out the water heater to reach the connections properly. Look at the situation and decide if you need to access the connections from inside your RV or remove the water heater for better access.
Reason 6: Broken Fitting/Clamps
The fittings in your Suburban RV water heater are usually made of brass and they are held in place with metal clamps. Sometimes these fittings and clamps can break which causes water to slowly leak or flow out continuously.
Again if the fitting is not secured enough it can also cause leaking issues.
How to Fix It:
First of all, check the fitting and if you find them not securely attached then secure them. Next, for damaged fittings/clamps. The best solution here is to keep a few spare connections and clamps in your toolbox. It’ll be more useful especially when you’re out camping on the weekend.
Remember, you’ll need a special tool to properly fasten the clamps, so it’s helpful to have one with you.
NB: If you ever need to take off a fitting or disconnect a water line, make sure to turn off the water supply and let any water in the lines drain out before you start.
Reason 7: Rusty Tank or Tank Fracture
If the tank is all rusty or has a crack inside it then it is a reason for water leaking. Unfortunately, you can’t fix it and you’ll have to replace it.
Now, if water is leaking from inside the tank or at the bottom, it means the tank is in bad shape and can’t be fixed. You need to take care of this right away to avoid water messing up your RV’s basement.
How to Fix it:
As I already mentioned, in this case, the solution is to replace the water heater tank. Simply you can contact the manufacturer or call for a professional technician for the RV water heater tank replacement.
NB: Improper winterization can cause damage to hot water tanks. Always take the necessary precautions to correctly winterize your RV, particularly if you travel to or store the RV in colder locations. Following proper winterization procedures can help prevent issues with the water heater and extend its lifespan.
FAQs:
What Are The Signs Of A Leaking Water Heater?
Signs of a leaking water heater include condensation, valve issues, high water temperature, corrosion, strange noises, rusty water, old age, and lack of hot water from your Suburban RV water heater. If you notice any of these signs, it may be time to consider replacing your water heater.
Where Do Water Heaters Leak from?
A water heater can leak from different positions. It can leak from the top or bottom. Again it can be an RV hot water heater leaking outside. Sometimes you may notice leaking a pressure relief valve, or a leak from the heating element.
How Long Will A Water Heater Last After It Starts Leaking?
The lifespan of a leaking water heater can vary depending on factors such as the location of the leak. Generally, water heaters last between twelve to fifteen years on average.
Can I Still Use A Water Heater If It Is Leaking?
Yes, you can use the water heater if it’s still leaking but it’s not recommended. Using such water decreases the lifespan of the water heater and will cost more water. So, It’s important to fix the water heater tank right away to prevent water from causing damage to your home and the appliance. If you notice a big leak, it’s best to turn off the appliance immediately and avoid using hot water until the issue is resolved.
Final Words
That was everything on the Suburban RV water heater leaking. I’ve already mentioned 7 problems with different leaking along with their solution.
If you pay proper attention then you’ll notice that one of the root causes of the problems is lack of maintenance. So, I suggest properly maintaining your RV water tank following the suggested time interval for different components. For a more detailed guide, you can check our other article – Suburban RV water heater maintenance guide.
Now before I leave you can read our complete troubleshooting guide on Suburban RV water heater to fix other issues with your heater that you may face.
Good Luck!