
Picture this: you’re on a long-awaited road trip with your RV, but suddenly, disaster strikes! Your water heater malfunctions, leaving you with cold showers and a frustrated crew. Don’t let this scenario become your reality, properly care for your Suburban RV water heater.
But how to do it? Are you now looking for a Suburban RV water heater maintenance guide? Well, the major maintenance includes-
- Inspecting the anode rod
- Inspecting and maintaining the air pocket
- Maintain the water heater bypass system
- Winterize Your RV Water Heater when the temps fall below freezing
- Checking if the water heater is full before you de-winterize
- Properly flushing a water heater tank
- Eliminating odor
This isn’t as easy as it feels. To complete every maintenance you’ll have to go through several steps. Just complete reading this article and learn the proper Suburban water heater maintenance tips and guide.
Table of Contents
7 Must Follow Suburban RV Water Heater Maintenance Guide
Now I’m about to explain the major maintenance guide. However, don’t worry about the water heater maintenance cost. I tried to explain the easiest and most affordable ways and the guide is applicable to all electric, gas, or tankless water heaters.
Maintenance 1: Inspect the Anode Rod Annually
If you want to keep your Suburban RV water heater properly protected make sure that you perform an annual removal and inspection of the Anode Rod.
Suburban water heaters are typically equipped with a magnesium anode rod, which offers effective protection against corrosion across a wide range of water types.
Moreover, this rod plays a crucial role in preventing corrosion by having a lower electrochemical potential than the steel tank. It is specifically designed to be more active in voltage than the tank itself when the tank is filled with water.
However, certain water conditions can cause the magnesium rod to corrode relatively quickly, even within a year. In such cases, Suburban recommends using an optional aluminum anode rod. It is less reactive than magnesium and has a slower consumption rate and longer lifespan.
To ensure proper protection of the water heater, Suburban advises removing and inspecting the anode rod at least once a year. It is crucial to monitor the rod’s condition and replace it when it is approximately 75 percent consumed. Regular maintenance and replacement of the anode rod help safeguard the water heater tank from corrosion, prolonging the lifespan of the water heater itself.
Below I’m mentioning how to do it-
Tools Required:
- Ratchet with the 1 and 1/16 socket
- Small wire brush
- Teflon tape
- Mineral oil
How to Do It?
Here I’m adding a 13-step guide to inspect the anode rod. So, let’s check it.
Step 1: In the first step, turn off the electrical power supply to the appliance either at the RV circuit breaker or at the element switch.
Step 2: Next, turn off the gas heating system controls of the appliance. And then Shut off the water supply to the appliance. This can be done either by turning off the onboard water pump or disconnecting the city water connection.
Step 3: In this step, release the pressure in the water system. To do it open both the hot and cold water faucets.
Step 4: Now you’ll have to get access to the anode rod. For this, first, open the exterior door of the water heater
Step 5: Now locate the anode rod. It is located on the front of the water heater at the center bottom position.
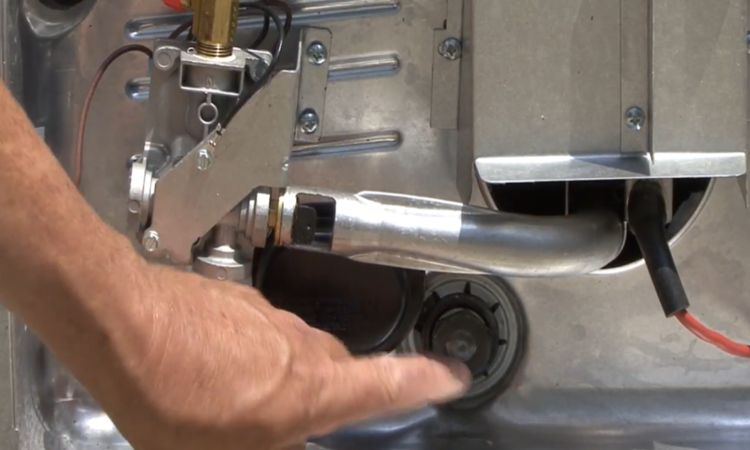
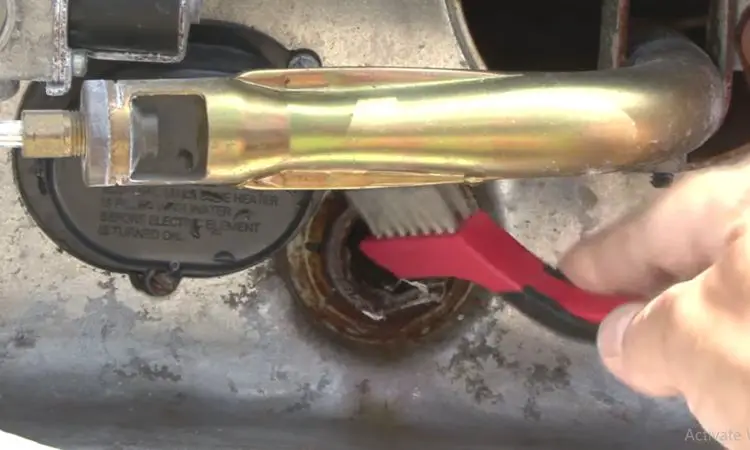
Step 6: Now take a ratchet with 1 and 1/16 sockets and rotate the anode rod counterclockwise. It will unthread it from the drain port.
NB: Sometimes you might have to put some extra pressure to remove the anode.
Step 7: Once it’s free use your hand and remove the anode rod. And after you open it, allow the water to drain properly from the tank.
Step 8: Now use a small wire brush and cleanse the threads of the drain port spud. It’ll remove any sediment deposits or leftover thread sealant.
Step 9: Next, apply mineral oil to thoroughly clean drain port threads to prevent corrosion and facilitate the installation of the replacement anode rod.
Step 10: Get a Teflon tape approved for potable water and apply it to the replacement anode rod threads.
Step 11: After that. Start threading the replacement anode rod into the drain port in a clockwise direction manually to ensure it is correctly threaded.
Step 12: Now again get the ratchet with an 11/16 socket and continue rotating the anode rod clockwise into the drain port. Continue rotating until you find it secure.
Step 13: So you’re almost done. In the final step, refill your water heater, inspect for leaks, and take the necessary actions by following our comprehensive guidelines on Suburban rv water heater leaking problems, in case you get any leakage.
Maintenance 2: Inspect And Maintain the Air Pocket (When You see Water Weeping/Dripping Issues)
During the operation of your water heater, you may observe water weeping or dripping from the pressure and temperature relief valve. Most of the time people think that it’s because of a faulty T&P valve.
But the reason doesn’t always indicate a faulty T&P valve. When water is heated, it naturally expands. For example, when six gallons of 70-degree water is heated to 130 degrees, the water will expand by approximately six ounces.
In a recreational vehicle, the water system operates as a closed loop and does not allow for the thermal expansion of the heated water. Consequently, when the pressure in the water system exceeds the relief point of the T&P valve, the valve will open and release the excess pressure.
To minimize the frequency of this occurrence, it is advisable to maintain an air pocket at the top of the water heater tank. This air pocket is designed to accommodate thermal expansion. However, over time, it may diminish due to regular use of the water heater.
Below I’m mentioning how to maintain the air pocket of a Suburban RV water heater. The good news for you is, here you’ll need no additional equipment.
How to do It?
This procedure is comparatively easier than the previous one. So, let’s learn about it.
Step 1: First, turn off the appliance heating system controls and then turn off the cold water supply to the appliance.
Step 2: Now open both the cool and hot water faucets in the RV. It’ll relieve the pressure. I suggest leaving them open for a few minutes.
Step 3: In this step, open the exterior door and locate the relief water valve. You’ll find it on the front of the water heater near the top center position.
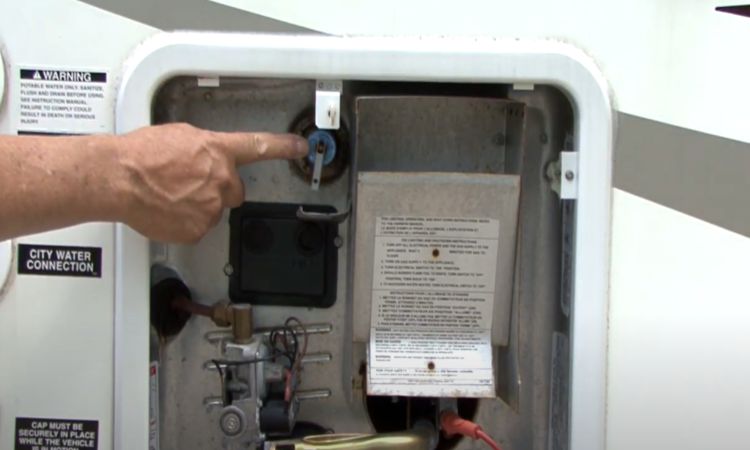
Step 4: Gently pull out the handle of the T&P valve outward and let the water drain from the valve until it comes to a complete stop.
Step 5: Release the handle on the T&P valve, and it should snap back into the closed position.
Step 6: Now, close the open faucets in the RV and then turn on the cold
water supply. As the tank fills, an air pocket will develop.
Step 7: Repeat this procedure as needed to minimize the occurrence of T&P valve weeping.
What If the Weeping Continues?
If T&P valve weeping continues despite following the recommended steps, you have the option to install an expansion or accumulator tank in the cold water line.
This device includes a bladder that can accommodate thermal expansion and relieve the additional pressure when a faucet is open. These devices are easy to install, relatively affordable, and can be obtained from a nearby RV retailer.
Maintenance 3: Maintain the Water Heater Bypass System
Suburban water heaters are commonly installed with a supply water bypass valve by the installer. The most common configuration for a bypass valve system consists of three manual valves: one at the cold water inlet, one at the hot water outlet, and one in the bypass plumbing line.
If your RV does not have the typical three-valve bypass system, it is advisable to consult with your RV water heater maintenance service center for other plumbing configurations.
Now it is also necessary to keep the three-valve bypass system properly engaged and positioned. Improperly positioned bypass valves can exhibit the following symptoms-
- Lack of hot water flows from the water heater.
- Only a brief supply of hot water followed by a quick transition to lukewarm and then cold.
If you encounter these symptoms, it is recommended to verify the positioning of your bypass valves to ensure they are correctly set.
Below I’ll discuss the process of positioning the bypass valves but before that, I would like to introduce you to the function of a bypass valve.
The bypass valve serves as a way to isolate the water heater from the RV’s plumbing system. It is required for purposes such as draining the water heater or winterizing the RV water system. Again, the bypass valve allows the incoming cold water to be redirected directly to the hot water plumbing line, bypassing the water heater.
How to Do It?
Now, let’s get into the maintenance part.
Step 1: To properly engage the three-valve bypass system, rotate the manual valves. It is located on the cold water inlet and hot water outlet so that the handle is parallel to the bypass line.
Step 2: Similarly, rotate the manual valve in the bypass line until the handle is parallel to the bypass line.
Once these valves are set, you can proceed to drain the tank of any water.
Maintenance 4: Winterize Your RV Water Heater When The Temps Fall Below Freezing
Winterizing your RV’s plumbing and water heater is an essential step to protect your vehicle from potential damage during cold weather. There are a few more reasons why you would winterize the water heater. Let’s learn about a few of them-
- Winterizing your water heater prevents frozen pipes during cold temperatures.
- Frozen pipes can lead to costly damage to your RV if they burst.
- It is part of a comprehensive strategy to safeguard your RV during any vacation to a cold area.
- Regular maintenance, including winterizing, extends the lifespan of your water heater.
- Proper winterization ensures the reliable performance of your plumbing system.
How to Do It?
Now let’s see how can you winterize the RV’s plumbing system and the water heater
Equipment:
- Air compressor
- Antifreeze (2-3 Gallons)
Step 1: Drain the Fresh Water Tank and Pipes
Start by disconnecting your RV from any external water source. Drain the fresh water and open all faucets, both hot and cold. Let the water run until there is no more water coming out.
NB: Ensure the water heater tank has cooled off before emptying it.
Step 2: Clean the Water Tank
Empty the water tank and flush and clean the tanks thoroughly. Make sure to remove any waste residue. It’s crucial to ensure that no water remains in the tanks, as even a small amount can freeze and cause damage. You can use an air compressor to blow air through the water lines to speed up drying.
Step 3: Bypass the Water Heater
Before introducing antifreeze into your water lines, bypass the water heater. If your RV doesn’t have a bypass kit, pouring antifreeze will fill the water heater first, wasting several gallons. Make sure to operate the water heater bypass valve to prevent this.
Step 4: Circulate the RV Antifreeze
Once your tanks and pipes are completely free of water, it’s time to introduce antifreeze. Typically, two to three gallons of antifreeze are sufficient for winterizing most RVs. Close the dump valves and pour a couple of gallons of antifreeze into the freshwater tank. Open each cold and hot water faucet, including the toilet, until you see pink antifreeze coming out.
Flush the toilet a few times as well. This process ensures that both the pipes and tanks are winterized.
Step 5: Flushing with ease
After winterizing the RV water heater and plumbing system, you can continue using the toilet and other things as usual. However, every time you flush the toilet, pour enough antifreeze to line the toilet bowl. This prevents the dilution of the antifreeze in the drain lines and blackwater tank.
Maintenance 5: Check If the Water Heater is Full Before You De-winterize
When you are de-winterizing your coach, ensure that your water heater tank is completely filled with water before turning on the gas or electric switches.
Operating a tank that is not filled with water can result in permanent damage to the water heater controls.
To check if the tank is full, a straightforward method is to lift the lever on the temperature and pressure relief valve. If water comes out, it indicates that the tank is full.
However, if there isn’t enough water coming out make sure to refill the water heater.
Maintenance 6: Properly Flush a Water Heater Tank Twice a Year
Under normal usage, sediment deposits and mineral buildup can accumulate inside the water heater tank. This can result in slower recovery time, reduced availability of hot water, and increased energy costs. Periodically flushing the water heater tank can help prolong the tank’s lifespan, reduce energy consumption, and eliminate tank noise issues.
So, it is recommended to flush the water heater tank twice a year in order to increase the lifespan of your water heater. Let’s see how you can do it.
Equipment:
- 1 1/16-inch socket
- Spray wand
- Flashlight
- Wet/dry vac
- VinegarF
- funnel
- 3/4-inch plug
- small wire brush
- mineral oil
- Teflon tape or a thread
How to Do It?
Here are the simple steps to follow to flush your RV water heater system:
Step 1: In the first step you’ll have to remove the anode rod. I’ve already explained how to do it. You can just check how to remove the anode rod in the Maintenance 1 section above.
Step 2: Now, open the temperature and pressure relief valve to facilitate faster draining of the tank.
Step 3: After that use a spray wand and rinse the inside of the tank thoroughly by inserting the spray wand into the drain port.
Step 4: Now, take a flashlight and inspect the inside of the tank through the drain port for sediment deposits that are too large to come out through the drain opening. It’s necessary to break or soften these deposits in order to remove them.
Step 5: Use a wet/dry vac with the hose attached or a battery filler bulb to attempt to remove the remaining water from the tank.
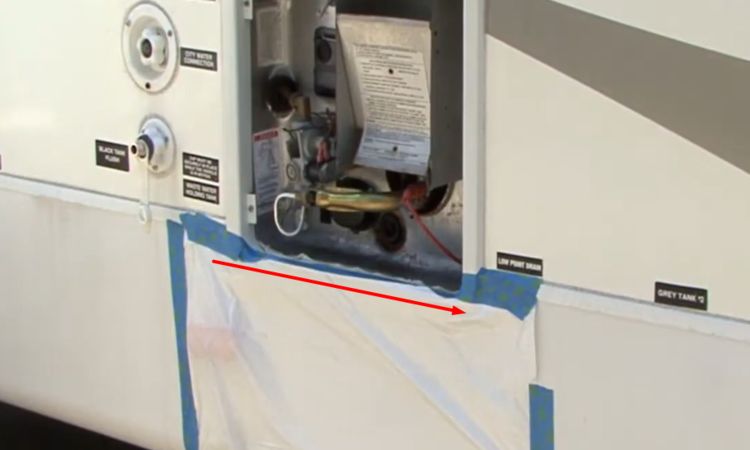
Step 6: Now before we get into the next step – protect the area of the RV sidewall under the water heater to prevent the vinegar from staining the finish.
Step 7: Drain the tank again if there are large deposits that are difficult to break up. Use a funnel to pour vinegar into the water heater tank through the drain port opening. Fill the tank until the vinegar starts to seep out of the drain port.
Step 8: Install a 3/4-inch plug in the drain port to prevent the vinegar from draining.
Note: Do not use the anode rod in this step, as vinegar can damage it. A 3/4-inch plug can be purchased at any hardware store.
Step 9: Allow the vinegar to sit in the tank for several hours, or ideally, overnight, to soften the sediment and deposits.
Step 10: Now when the sediment is softened, remove the plug from the drain port to allow the vinegar and loose sediment to drain.
Step 11: Use the spray wand to flush the tank and remove any remaining sediment.
Step 12: After that, Turn on the water supply to the tank to rinse and flush out any remaining vinegar and sediment. Rinse with fresh water as needed and repeat if necessary.
Step 13: Now use a small wire brush and clean the drain port spud threads to remove any sediment deposits or remaining thread sealant.
Step 14: Add mineral oil to the cleaned drain port threads to prevent corrosion and assist in installing the replacement anode rod.
Step 15: Apply Teflon tape or a thread sealant (Approved for potable water) to the threads of both the replacement and old anode rod.
Step 16: Start threading the replacement anode rod into the drain port clockwise by hand to ensure it is properly threaded.
Step 17: Use the ratchet with a 1 1/16-inch socket to continue rotating the anode rod clockwise into the drain port until it is secure.
Step 18: Refill the water heater and inspect for leaks. If you find any then take the necessary actions.
Maintenance: 7: Check and Eliminate Odor
Sometimes, when operating the water heater, you may notice a rotten egg smell emanating from the water. To address this issue, it’s important to determine if the smell is coming from the hot water system alone or from both the hot and cold water systems. Here’s how you can diagnose the source of the odor:
Step 1: First, turn on a hot water faucet and check the smell of the water. Take note of any unpleasant odor.
Step 2: Next, turn off the hot water faucet and repeat the process with a cold water faucet. Assess the smell of the water again.
Based on your observations, you can pinpoint the root cause of the odor:
- If the smell is present in both the hot and cold water systems, the issue may lie within the freshwater system. Bacteria might be present, requiring a thorough system flush and proper treatment to eliminate the bacteria.
- If you notice an odor resembling rotten eggs specifically from the hot water system, it could be due to a high level of sulfur or bacteria in the water reacting with the anode rod. In this case, the odor from the hot water system is not necessarily a service problem, as many water supplies naturally contain sulfur that can produce an unpleasant odor. However, it is important to note that the odor is harmless but may be unpleasant to smell.
To eliminate odor caused by bacteria, chlorination of the water system is an effective remedy.
How to Do It?
Now let’s get the detailed process for this maintenance task.
Step 1: Prepare a solution of chlorinated household liquid bleach by adding approximately 6 ounces of bleach to every 10 gallons of water in your freshwater tank. Mix the bleach with water in a 1-gallon jug and use a funnel to pour it into the freshwater holding tank.
Step 2: Now remove the anode rod, relieve the pressure in the system, drain the tank completely, and reinstall the anode rod to the heater.
I’ve already mentioned the steps before. If you want a detailed guide, you can check it in maintenance section 1.
Step 3: Turn on the water pump to refill the water heater tank with chlorinated water. Run the chlorinated water throughout the hot water plumbing system by opening each hot water faucet one at a time until you can get the chlorine smell.
Step 4: Let your RV sit for a minimum of 12 hours to allow the chlorine to eliminate the bacteria causing the odor.
Step 5: After the recommended duration, drain the water system and flush it with fresh water to remove the dead bacteria and chlorine. This may require multiple attempts to ensure thorough flushing.
Step 6: If the odor problem persists, you may consider installing a filtering system that removes chlorine and prevents sulfur water.
Step 7: If the rotten egg smell is caused by the reaction of the anode rod to sulfur in the water, you can slow down this reaction by replacing the standard magnesium anode rod with an aluminum one. Consult a local repair facility for more information on the process of replacing the anode rod.
NB: It is important to note that removing the anode rod and replacing it with a plug is not recommended, as it will significantly reduce the lifespan of the water heater tank.
Regular Maintenance Tips for Suburban RV Water Heater
Above I’ve added some major maintenance guides. Aside from those, there are a few more tips you should follow. Here I’m adding the:
- Avoid turning on the water heater when it’s empty. Make sure the tank is full by running the hot side of a faucet until a steady stream of water comes out. Turning on the heater when the tank is empty can damage it.
- Examine the water heater vents weekly or monthly, depending on usage. Clean the vents, wiping away any debris that may have accumulated.
- Drain the water heater when it’s not in use, especially if you leave your RV sitting for a long time. Stagnant water can become stale and unfit for use.
- Clean the tank before your first trip in spring. Use an RV water heater rinser and rinse everything thoroughly with a water hose. If there are long gaps between trips, consider repeating this process before each adventure.
- Install a water heater bypass valve, especially for winter preparations. Check if your RV already has one and install it if needed to protect the water heater during cold weather.
- If your RV water heater runs on propane, it has a burner tube. Use compressed air or a brush with nylon bristles to clean out the burner. Remove any debris, bugs, nests, or spider webs. Accumulated debris in the tube can cause a small fire and damage the thermal cut-off.
- Inspect the water heater before each trip. Look for debris in the burner and vent slots, check for leaks, and watch out for black marks caused by improper air and fuel mixture in gas water heaters.
- Cleaning the main burner orifice is something you should do regularly as part of maintenance. It helps to keep dirt away from the gas line, orifice, and burner gas ports. And if you don’t do so then it can cause problems like the burner not lighting or reduced performance.
- Inspect the Electrode Assembly from time to time for the water heater as it ensures efficient water supply and works as a safety device for the water heater when there are some failures. A damaged electrode assembly can cause a sooty flame, indicating the need for replacement. Additionally, if your Suburban RV water heater isn’t producing hot water or the water isn’t as hot as usual, it could be a sign of a failing electrode assembly.
FAQs:
How Often Should I Clean My RV Water Heater?
It is recommended to clean and service your RV water heater annually. Clean and drain the water heater at the end of each camping season before winterizing your RV. Additionally, for Suburban water heaters, remember to replace the anode rod on an annual basis.
How Often Should You Flush Your RV Water Heater?
I recommend flushing your RV water heater at least twice a year. Flushing the water heater is a crucial maintenance step to eliminate mineral buildup, particularly calcium deposits. For regular RV usage, you should flush the tank approximately 4 times per year to ensure optimal performance and longevity.
Can I leave my RV Hot Water Heater Turned on?
You can leave your RV water heater turned on as long as there is water in the tank. Before turning on the water heater, ensure that you have filled the fresh water tank or connected it to a city water supply. Let the water run through the faucets for a few minutes to ensure proper water flow before switching on the water heater.
What Will Happen If I Don’t Flush the Water Heater?
If you don’t regularly flush your water heater will corrode more quickly. Additionally, there will be sediment built-up and it’ll block the pressure and relief valve. So your water heater will be no more safe.
Final Verdict
So that was everything I got for you on – Suburban RV water heater maintenance guide. In this comprehensive guide, I’ve discussed step-by-step maintenance instructions, expert tips, and valuable insights to make your RV water heater maintenance a breeze. And no matter whether you are using an electric, gas, or tankless water heater, you can apply this maintenance for your heater.
Finally, one more tip for you. Make sure you follow the proper schedule before you step into any maintenance procedure.
So, that’s all for now. Just follow this guideline and I assure you No More icy surprises when you step into the shower or unexpected breakdowns that put a damper on your vacation.
Plus, if you are struggling with your heater’s won’t stay lit issue, then you can explore our ultimate Suburban water heater won’t light or stay lit guide to fix it by yourself.