Takagi water heater is a well-reputed water heater, but sometimes, it can run into problems after being used for a while. Some find the issues sooner and some find the issues after a long period of usage. But what’s the reason behind this? It’s all about proper maintenance. So, you may be looking for the Takagi tankless water heater maintenance guide to avoid issues with the Takagi water heater.
The first thing you need to do is to keep the heater clean. You’ll have to keep the filter, rod assembly, and combustion chamber clean. Aside from that unit draining and descaling is also important.
In this article, I’ve mentioned all the maintenance guides with proper detail. Just keep on reading and learn everything.
Table of Contents

Takagi Tankless Water Heater Maintenance: At a Glance
Before getting into the in-depth guide here is a quick overview of the maintenance we are going to discuss. Have a look at the table below for a quick understanding.
| Maintenance Task | Description |
| Maintaining Combustion Components | Ensuring combustion components (fans, burner, sensors) stay free of debris and in optimal condition. |
| Rod Assembly Maintenance | Keeping the rod assembly clean and functional. |
| Filter Cleansing | Clearing and cleaning the filter for smooth operation. |
| Unit Draining & Power Outage | Safeguarding against freezing by draining the unit during power outages (Freeze Protection). |
| Inlet Gas Pressure Measurement | Checking and measuring the gas pressure at the unit’s inlet. |
| Flow Sensor Inspection | Checking the water heater’s flow sensor for proper functionality. |
| Unit Descaling | Eliminating scale buildup to maintain the unit’s efficiency. |
Maintenance 1: Cleaning The Combustion Components
The combustion components of a Takagi heating system include the fan, burner, flame sensor, and Air-Fuel Ratio (AFR). Cleaning the combustion components is crucial for maintaining optimal performance and efficiency. Here I’ll discuss a step-by-step procedure for cleaning these components.
Prepare Your Tools
Before you start you’ll need some essential tools. Here is the list of tools.
- Degreaser (in a pump action bottle)
- Sandpaper
- Needle-Nosed Pliers
- Duct Tape, Flashlight
- Air Compressor
- Philips Screwdriver
- Shop Vacuum
- 3x Towels.
Step 1: Disconnect The Power And Gas Supply
First, disconnect the power by unplugging the switch or using the circuit breaker. And turn off the gas supply.
Step 2: Remove Front Cover:
Find the front cover of your tankless unit and then remove the two screws positioned at the top corners. Carefully remove the front cover after removing these screws.
Step 3: Disassemble The Manifold Plate/Gas Valve Assembly
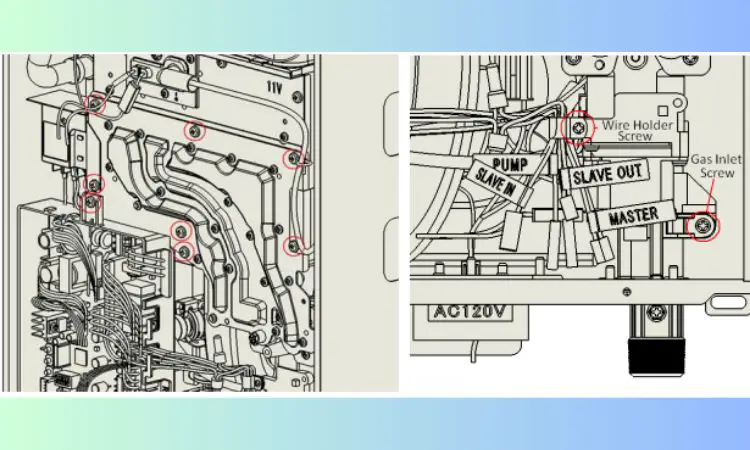
This is a crucial step. Here you will have to disassemble the manifold and gas valve assembly.
- Now take the Phillips screwdriver and unscrew the wide pan head Phillips screws on the edges of the stamped metal plate that holds the manifold.
- Next, remove the brass gas valve screw.
- After that, remove the wire that holds the Easy-Link wires in place.
- Disconnect the clear plastic tube located beneath the combustion chamber.
- Carefully lift the manifold and gas valve assembly to detach it from the gas inlet, and then let it hang.
NB: There is a small filter screen at the bottom of the gas inlet; be careful not to lose it.
Step 4: Remove The Burner Assembly
Now it’s time to remove the burner assembly. Check out the process below.
- Unscrew the five wide pan head Phillips screws that secure the burner to the combustion chamber. There are three at the top and two at the bottom to the back of the combustion chamber.
- Now, disconnect the rod assembly, including the Orange flame sensor, Yellow AFR, and Black igniter wire. Check the previous segment for more details.
- Now remove the burner. My previous experience says it would be a bit difficult for you to do it, especially, if you’re not well experienced. I am breaking it down a bit more.
- Grip the front oval air vents with pliers on the far left and right, pulling firmly.
- Pull from the center for easy removal.
- At last, inspect the gasket.
Step 5: Clean The Burner
It’s time for cleaning. In this step, you’ll need a degreaser. Utilize a degreaser in a pump action bottle.
- Protect the burner gasket from direct water pressure. If you find the gasket compromised, contact the Technical Service Department.
- Properly soak the burner using the cleaning solution from the top, down through the slots, and into the front openings until the entire burner is thoroughly wet.
- Allow the burner to sit for 5 minutes.
- Now Remove the burner from the solution and then position it upright in a sink. Now, rinse it thoroughly with a strong stream of water directed into the slots. Start washing from the back and move towards the front, but be careful to avoid any contact with the gaskets.
- Use compressed air to remove excess water from the burner after rinsing. Check the gasket again.
Step 6: Clean The Fan
If you clean the burner let’s clean the fan. Cleaning the fan isn’t a highly problematic task. Let’s see how to do it.
- First, cover the square port to the fan at the bottom of the heat exchanger with a towel. It should catch all the dust.
- Now use compressed air to blow into the fan. It will rotate and the dust will come out of the fan housing and settle on the towel above.
Step 7: Inspect The Combustion Chamber
In this step, you’ll need a torch/flashlight first to inspect the combustion chamber properly. Let’s see how to do it.
- For DV models, remove the exhaust venting from the top of the unit.
- Keep the fan discharge (fan port) protected by placing a towel at the bottom of the combustion chamber. Additionally, put another towel over the square opening of the combustion chamber to prevent airborne debris.
- Turn on the shop vacuum and remove all dirt from the combustion chamber.
- Simultaneously, use the air compressor to blow air down through the top of the heat exchanger via the vent collar. It’ll eliminate additional contaminants.
Step 7: Check The Heat Exchanger
I wouldn’t recommend cleaning the heat exchanger manually. So, if you find a white, crusty solid buildup in the heat exchanger, please contact the Technical Service Department for further guidance.
Step 8: Clean The Sensors
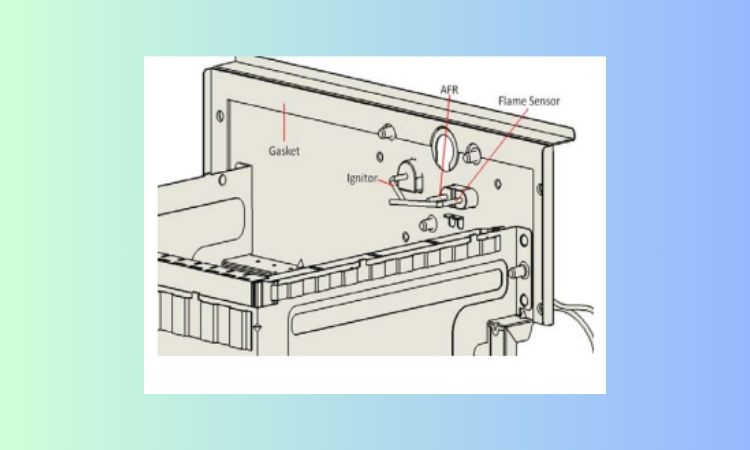
Cleaning the sensor won’t be a big hassle. Let’s see how can you do it,
- Take sandpaper and clean the flame sensor and AFR thoroughly until they have a bright finish.
- Be careful when cleaning the sensor rods because they can easily bend. Keep their original position the same relative to the burner so they work correctly
Step 9: Reassemble The Unit:
The job is done and now it’s time to reassemble the unit. While reassembling the unit keep the following things in mind.
- Inspect all gaskets properly.
- Pay attention to the black O-ring and mesh filter on the gas valve inlet.
- Reconnect the plastic tube from the gas valve to the bottom of the combustion chamber.
- Reattach all components secured by the manifold screws.
- Reconnect all wires to the computer board and any other clips.
- Ensure no screws are left over.
Note that the guide I explained is for the 110, 310, and 510 (Indoor and Outdoor) Models. More or less the cleaning process is the same but I would recommend double-checking the manual before you perform.
Maintenance 2: Cleaning The Rod Assembly
Now, I’ll discuss rod assembly cleaning. Cleaning the rod assembly in your tankless unit is one of the major maintenance tasks. Follow this step-by-step guide to clean the rod assembly effectively:
Materials Needed
Let’s get the list of the components you’re gonna need in this procedure.
- #2 Phillips Screwdriver
- Sheet of 100 Grit Sandpaper
- Torch/Flashlight
Before You Begin
Before we start you’ll have to disconnect the power to your unit. You can do this either by unplugging it from the wall outlet or turning off the circuit breaker. It depends on the setup. But ensure that the 3‐digit LED on the PCB is not lit.
Step 1: Remove The Front Cover
The very first step here is to remove the front cover. Let’s see how to do it.
- Locate the front cover on your tankless unit.
- Now locate the two screws positioned at the top corners. Remove the two screws securing the front cover.
- Carefully take off the front cover.
Step 2: Locate The Rod Assembly
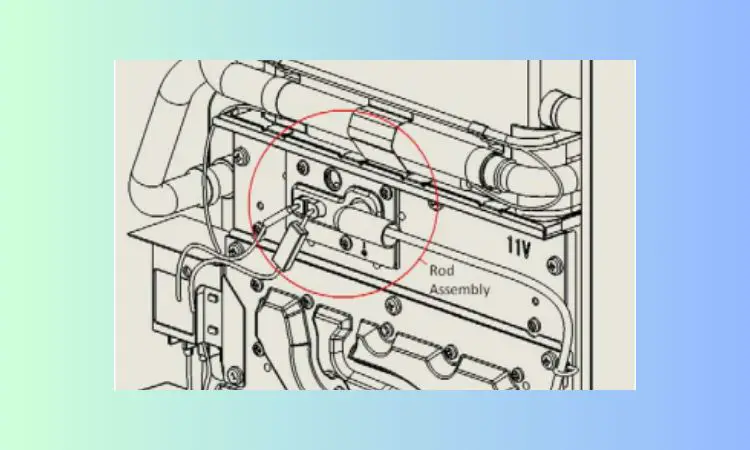
In this step, you’ll have to pull out the rod assembly.
- Check the center of the unit and you’ll find the black, yellow, and orange wires.
- Now, locate the panel that covers the rod assembly and remove the three Phillips head screws.
- Finally, Pull the rod assembly out.
NB: Here all the pieces are separate. Make sure you don’t lose the sight glass during this step.
Step 3: Cleaning The Flame Sensor And Air Fuel Ratio Rod
This is the main cleaning part. Here make sure to be gentle with the sensors while cleaning them because there is a bending. Too much pressure can bend them out of the place easily. Also, be careful to get them back to their original position. Otherwise, it may not function properly.
- Flame Sensor: Gently clean the flame sensor using the 100 grit sandpaper. Ensure thorough cleaning to achieve a bright finish.
- Air Fuel Ratio Rod: Clean the air-fuel ratio rod properly using the 100-grit sandpaper. Make sure to achieve a bright finish.
Step 4: Reassemble The Rod Assembly
Your main task is done and it’s time to reassemble it. Carefully reassemble the rod assembly by following the given steps:
- Place the sight glass and rods back in their original position.
- Ensure the gasket is in good condition and properly positioned.
- Reattach the front cover and secure it with the previously removed screws.
- Connect all three wires on the front of the burner.
- Double-check the connections of the wires on the front of the burner.
Maintenance 3: Cleaning The Filter
Now, I’ll provide a detailed guide on how to clean the filter of a Takagi tankless water heater.
Step 1: Drain The Unit
Check the previous section on draining the unit for detailed instructions on how to do this.
Step 2: Locate And Remove The Water Filter
The water filter is usually inside the cold water inlet of the Takagi water heater. Follow these steps to locate it:

- Make sure the unit is turned off, and the gas supply is shut off.
- Find the cold water inlet following the image.
- Carefully remove the water filter from the cold water inlet. If tightly screwed, you may need to use a wrench or pliers.
Step 3: Clean The Water Filter
After removing the filter, start the cleaning process:
- Check the filter for debris, sediment, or particles.
- Use a small brush, like a toothbrush or a soft bristle brush, to gently clean the filter. Remove all debris and visible sediment.
- For stubborn debris, rinse the filter with clean water. Avoid harsh chemicals or abrasive materials that could damage the filter.
Step 4: Reinsert The Filter
Once the filter is clean, reinsert it into the cold water inlet:
- Properly align the filter with the inlet and ensure it’s in the correct orientation.
- Securely screw the filter back into position. Use only your hands to tighten it. This helps prevent any damage to the filter or the inlet
For a detailed guide on cleaning the Takagi water heater filter, you can check the linked article.
Maintenance 4: Unit Draining & Power Outage (Freeze Protection)
If you’re not going to use your heater for a while, make sure to drain all the water out and turn off the power. This will stop the water heater from freezing and getting damaged. Plus it’s suggested to drain your heater every 5 or 6 months.
Follow these steps and learn how to drain Takagi tankless water heaters.

- Close the manual gas shutoff valve.
- Turn off the power to the unit, wait for 5 seconds, and then turn it back on.
- After waiting 30 seconds, turn off the power to the unit again.
- Now, close the inlet water valve.
- After that, open all the hot water taps in the house. Once the residual water flow stops, close all hot water taps.
- Prepare a bucket or pan to catch water from the unit’s drain plugs. If there are isolation valves installed, open the drains to let the water out. If they aren’t installed, unscrew the filters and open the pressure relief valve to drain all water. Don’t lose the O-rings on the two filter caps.
- Look for an additional drain plug that drains the small line covering the water line between the primary and secondary heat exchangers. Unscrew this plug to drain the water line.
- Now Drain the X3™ Cartridge. To do it Use a bucket to catch water from the X3™ Cartridge. Turn it left until the “A” symbol aligns with the “B” symbol, then pull down to remove it from the water heater. Here is the list of the symbols.
- Symbol A:
- Symbol B :
- Completely drain the water from the X3™ Cartridge.
- Wait a few minutes to ensure all water has fully drained from the unit.
- Keep the cold/hot water valves closed, the gas valve closed, and the supply power disconnected.
- Securely screw the drain plugs back into place. Hand-tighten only.
NB: This unit drawing guide is specially for the 240HX3, 340HX3, and 540HX3 models. However, the draining method is almost for the other models.
Maintenance 5: Measuring Inlet Gas Pressure
Checking the inlet gas pressure is crucial for the water heater to function effectively. However, it’s not an easy task to do. Follow the given instructions and learn how to measure inlet gas pressure.
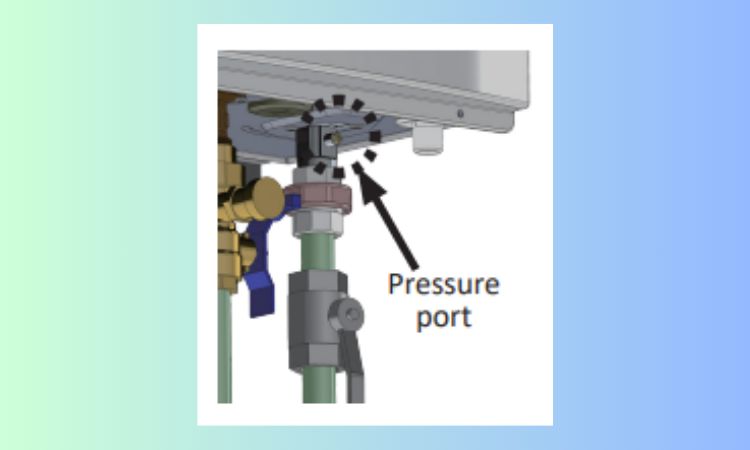
- Start by turning off the manual gas valve on the gas supply line.
- Now remove the screw from the pressure port located on the gas inlet of the water heater, as shown in the image above.
- Connect the manometer to the pressure port and set it to zero.
- Re-open the manual gas valve and ensure there are no gas leaks.
- With all gas-burning equipment turned off, record the static gas pressure.
- Measure the gas supply pressure at maximum heater operation. To do it, open hot water faucets for maximum flow and press the MAX button on the computer board. Record the dynamic gas pressure with all gas-burning equipment running at the maximum rate.
- Ensure the static and dynamic pressures fall within the specified ranges on the heater’s rating plate. (You can check the range in your user manual)
- The difference between static and dynamic pressure should not exceed 1.5″ W.C. If it exceeds this might indicate restricted gas flow, undersized gas lines, or undersized supply regulators.
- Finally, measure gas supply pressure at minimum heater operation. To do it reduce water flow to achieve minimal operation. Then press the MIN button on the computer board, and record the supply gas pressure. Verify that it falls within the specified inlet gas pressure range.
NB: It is always recommended to perform this task only by a licensed professional.
Maintenance 6: Checking The Water Heater’s Flow Sensor
If the tankless water heater is connected to water, gas, and power but the fan doesn’t start when water runs through it, the flow sensor might not be working. This sensor is essential for signaling the control board to start the unit. Here’s what you can do to fix it:
Tools You’ll Need
Here is the list of tools you’ll need to check the flow sensor.
- #2 Philips Screwdriver
- Degreaser in a spray bottle
- Flashlight
- Old Towels (at least 3)
Step 1: Prepare The Unit:
First, drain the water heater by following the given instructions previously and then turn off the power to the unit.
Step 2: Remove The Front Cover:
Remove the 2 screws at the top of the front cover and then remove it.
Step 3: Access The Computer Board
To access the computer board remove the screw that holds the computer board to the manifold. Let the computer board hang in front of the unit. Then disconnect the flow sensor wire.
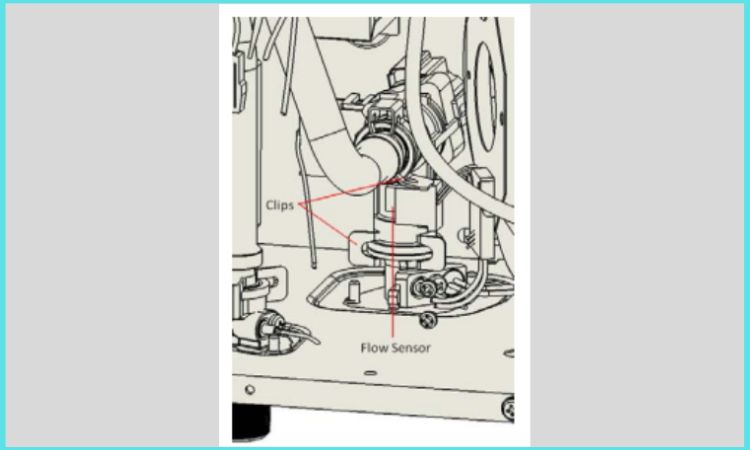
Step 4: Disconnect From Waterway:
At this step, locate the flow sensor behind the computer board. Then remove the waterway clips on each side of the flow sensor by pushing on the tabs.
Step 5: Check For Flow Sensor
This is the most important step of this procedure. Let’s see how to check the flow sensor.
- See if the flow sensor is working properly. It measures flow by using a spinning impeller when fluid passes through.
- Blow into the flow sensor’s inlet and listen for the impeller’s spin. It should spin freely for a few seconds. If it stops suddenly or doesn’t spin, it needs cleaning or replacement.
- Soak the flow sensor in lemon juice or another degreaser for 30 minutes and check the spinning capability again.
- Finally, test the cleaned flow sensor by “jumping” the system. Here are the guidelines for this procedure.
- Reattach the flow sensor wires.
- Turn the power back on to the unit (make sure the gas is still off).
- Blow into the flow sensor; if the fan starts, it means the flow sensor is now working properly.
Step 6: Reassemble Everything
Put the unit back together in the reverse order. Make sure all O-rings and waterway clips are in their correct places.
Maintenance 7: Descaling The Unit
When you are using the tankless water heater for a long time, it may gather hard water buildup inside the heat exchanger. These buildups make it hard to transfer heat to the water, and it reduces the efficiency of the water heater. All these cause extra wear on its parts. To avoid these problems descaling is necessary. In this segment, you’ll learn the process of descaling the Takagi tankless water heaters.
Required Tools
Before you start descaling the unit get to about the required tools.
- Submersible transfer pump
- 3 gallons of 5% acidity white food-grade vinegar
- 2 Washing machine hoses
- A bucket (5 Gallon)
- Water heater isolation valve kits
Step 1: Adjust Temperature
Press the UP ARROW on the temperature controller to increase the set temperature to 140°F. If needed, follow specific instructions to surpass safety stops. If you’re confused about the Takagi water heater temperature adjustment you can check my other article on this.
Step 2: Start Heating Water
Open any hot water fixture to initiate water heating. Allow the water heater to operate for 60 seconds.
Step 3: Turn Off the Power
Now, turn off the power using the switch at the water heater’s fuse box, unplug the heater (indoor models), or turn off the associated circuit breaker (outdoor models). Close the hot water fixture.
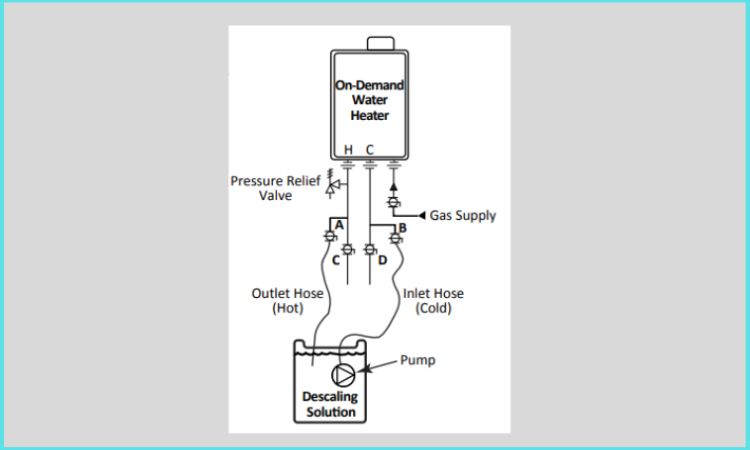
Step 4: Isolate The Water Heater
To isolate the water heater you’ll have to just Close the isolation valves (C & D). Follow the given image for better understanding.
Step 5: Prepare Vinegar Solution
It’s time to prepare the vinegar solution. Pour 3 gallons of white vinegar into the five-gallon bucket.
Step 6: Connect Hoses To Pump
Connect one hose to the transfer pump’s discharge outlet and its opposite end to the cold water inlet’s isolation valve (B). Place the pump in the bucket of vinegar. Connect the second hose to the hot water outlet (A) and place its end into the bucket.
Step 7: Open Service Valves And Run The Pump
After that, open both hot and cold service valves (A & B) and then turn on the pump and let it run for 45 minutes.
Step 8: Drain The Vinegar
Now, ensure a bucket is underneath the drain port. Remove the drain plug and let the vinegar drain. Reinstall the drain port plug after draining.
Step 9: Remove Hoses And Open Valves
At this step, close both service valves (A & B), remove the hoses, and open the isolation valves (C & D).
Step 10: Flush With Water
Now, open the hot water fixture closest to the heater and let the water run for a few minutes to remove any remaining vinegar.
Step 11: Repeat Drainage
Close valve D, remove the drain port’s plug, and let water flow through the drain port for about 10 seconds. Close valve D and reinstall the drain port’s plug. Make sure that the O-ring is still
attached at the end of the plug.
Step 12: Open Valve D And Turn Power On
Now open valve D again and turn the water heater’s power back on. Now adjust the temperature setting to what it was before you started descaling.
Step 13: Remove Air from The Line
Wait until all air is pushed out of the water line, then close the open hot water fixture.
FAQs:
Do tankless water heaters require maintenance?
Tankless water heaters usually need maintenance once a year. But if your water is hard or you keep it hot, you might have to take care of it more often.
What is the lifespan of a Takagi tankless water heater?
A Takagi tankless water heater can last twice as long as regular tank heaters. So, these tankless ones can keep providing hot water for about 20 years.
What happens if you don’t clean the tankless water heater?
If you don’t clean a tankless water heater, minerals, and sediment can pile up in the filter and hose. This buildup can restrict the water flow. So, you won’t get hot water when you need it.
How can I tell the age of my Takagi tankless water heater?
To find out how old your Takagi tankless water heater is, you can check the serial number. The date it was made is in there.
Final Words
I hope you are now clear about the maintenance guide for the Takagi water heater. Remember taking care of your Takagi water heater is highly important for it to work well. I’ve mentioned 7 maintenance guides in this article in proper detail.
Now before I leave, here is some advice for you. Schedule routine inspections to catch any potential issues early and don’t try to perform anything if you’re not a professional one.
That’s all for now. If you’re interested to learn about Takagi water heater error codes then read the linked article.